There are few household frustrations quite like running your vacuum cleaner over a patch of dirt only to see it remain stubbornly on the floor. A vacuum that fails to pick up dirt isn’t just annoying; it’s a major setback to keeping your home clean and hygienic. Before you throw in the towel or rush to buy a new appliance, understanding the common reasons behind this performance drop can save you time, money, and a great deal of stress. Often, the solution is simpler than you might imagine, involving quick fixes that can restore your vacuum’s powerful suction.
This comprehensive guide will walk you through the most frequent culprits behind a loss of dirt pickup, from easily rectifiable blockages and dirty components to more intricate mechanical issues. We’ll explore step-by-step troubleshooting for various vacuum types and offer essential maintenance tips to ensure your machine always performs at its best, keeping your home spotless.
Understanding Your Vacuum’s Suction Power
At its core, a vacuum cleaner works by creating a partial vacuum (lower pressure) inside its system, which then draws air—and with it, dirt and debris—from the higher-pressure environment outside. This airflow is generated by a motor and fan, and its efficiency is crucial for effective cleaning. When your vacuum stops picking up dirt, it’s usually a clear sign that this delicate balance of airflow and suction is being compromised somewhere along the line.
Effective dirt pickup isn’t just about surface-level cleanliness; it impacts indoor air quality, helps prolong the life of your carpets and floors, and prevents the buildup of allergens and dust mites. Therefore, addressing a loss of suction promptly is vital for both your home’s appearance and your family’s health.
Common Reasons Your Vacuum Isn’t Picking Up Dirt
When your vacuum cleaner loses its dirt-picking prowess, the issue often stems from one of several common problems. Pinpointing the exact cause is the first step toward restoring your machine’s efficiency.
Clogged Filters
|
Our Picks for the Best Vacuum cleaner in 2026
As an Amazon Associate I earn from qualifying purchases.
|
||
| Num | Product | Action |
|---|---|---|
| 1 | Eureka NEU10AE5 Powerful Bagless Upright Vacuum Cleaner Carpet and Floor, AirSpeed Ultra-Lightweight Vacuum Cleaner, w/ Replacement Filter, Blue |

|
| 2 | Shark Upright Vacuum, Navigator Lift-Away Deluxe with Large Dust Cup Capacity, HEPA Filter, Swivel Steering, Upholstery Tool & Crevice Tool, Blue, NV360 |
|
| 3 | Eureka Lightweight Powerful Upright Vacuum Cleaner for Carpet and Hard Floor, PowerSpeed, New Model,Blue,black/New Model |
|
| 4 | Bissell CleanView Compact Upright Vacuum, Fits in Dorm Rooms & Apartments, Lightweight with Powerful Suction and Removable Extension Wand, 3508 |
|
| 5 | Eureka PowerSpeed NEU181A Upright Vacuum Cleaner For Daily Cleaning for Pet-Owning Households , 5-Height Adjustment-Powerful Suction-Large Dust Cup-Pet Turbo Brush,Suitabe For Carpets & Hard Floors |
|
| 6 | Shark NV352 Navigator Lift Away Upright Vacuum, Hepa Filter, Anti-Allergen Technology, Swivel Steering, Ideal for Carpet, Stairs, & Bare Floors, with Wide Upholstery & Crevice Tools, Lavender |
|
| 7 | Cordless Vacuum Cleaner, 550W 45kPa 65Mins Vacuum Cleaners for Home with LED Display, Self-Standing Stick Vacuum with Anti-Tangle Brush, Rechargeable Vacuum Cordless for Pet Hair/Carpet/Floor |
|
| 8 | UNINELL HOME Cordless Vacuum Cleaner, 45,000Pa/450W Stick Vacuum Cleaners for Home, 60 Mins Runtime, Self-Standing, Detachable Battery, Anti-Tangle Brush, Lightweight Wireless Vacuum for Pet Hair |
|
| 9 | MONSGA Cordless Vacuum Cleaner, 45KPa 400W Stick Vacuum for Home, 50Mins Anti-Tangled Vacuum Cleaner with Charging Dock, Light-weighted Handheld Vacuum for Pet Hair/Carpet/Floor, LED Touch Display,MV3 |
|
| 10 | Bissell CleanView Compact Turbo Upright Vacuum with Quick Release Wand, Full Size Power, Compact Size for Apartments & Dorms, 3437F |
|
Dirty or clogged filters are arguably the most common reason for reduced suction. Filters are designed to trap dust and allergens, preventing them from recirculating into your home’s air or reaching the motor. Over time, these filters become saturated with fine particles, restricting airflow and causing the motor to work harder, leading to decreased suction power and potential overheating. Most vacuums have at least one pre-motor filter and often a post-motor or HEPA filter.
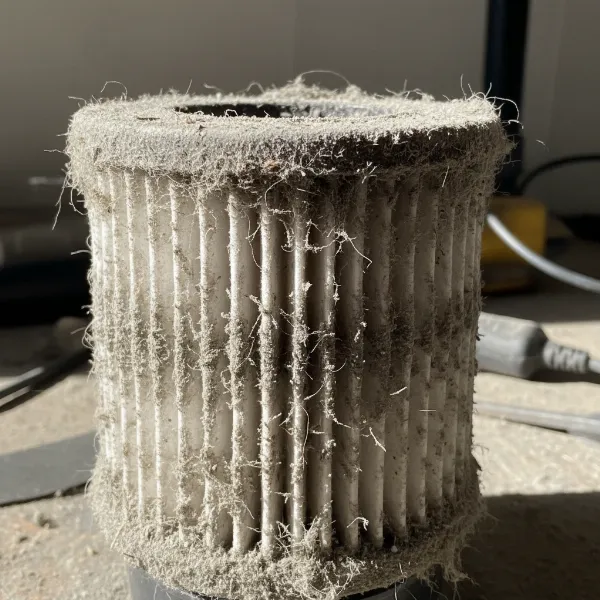 A close-up of a heavily dust-clogged vacuum cleaner filter, showing trapped dirt and debris.
Blocked Hoses or Attachments
Obstructions within the vacuum’s hoses, wands, or attachments can severely impede airflow. Items like socks, large clumps of hair, pet fur, or even small toys can get inadvertently sucked up and lodged, creating a bottleneck that prevents dirt from reaching the dustbin. If you hear a high-pitched whistling sound or the motor seems to be straining without picking up debris, a blockage is a likely culprit.
Full Dust Bag or Canister
It might seem obvious, but an overfilled dust bag or canister is a frequent cause of poor suction. When the container reaches its maximum capacity, there’s no longer enough space for air to pass through freely, leading to a significant drop in cleaning performance. For bagged vacuums, the pores of the bag can also become coated with fine dust, reducing permeability even if the bag isn’t completely “full.”
Worn or Damaged Brush Roll
The brush roll (also known as the beater bar) in the vacuum’s floorhead is critical for agitating carpets and dislodging dirt, making it easier for the vacuum to suck it up. If the brush roll is tangled with hair, string, or fibers, or if its belt is broken or worn, it won’t spin effectively. This means dirt remains embedded in carpets, giving the illusion of lost suction even if the motor is still pulling air.
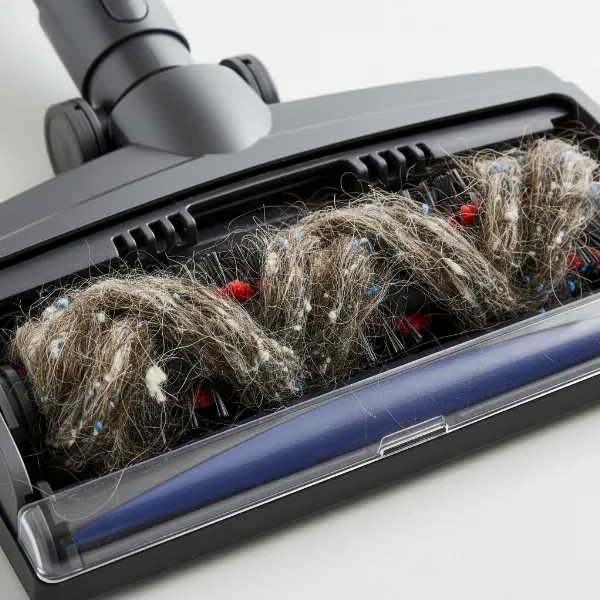 A vacuum cleaner's brush roll tangled with long hair, string, and fibers, impeding its rotation.
Air Leaks in the System
Any cracks, tears, or loose connections in the vacuum’s sealed system can lead to air leaks, significantly reducing suction power. Air entering through these unintended gaps means less air is being drawn through the nozzle where it’s needed to pick up dirt. Check the hose for splits, ensure the dustbin or bag compartment is fully closed, and verify that all attachments are securely fitted.
Incorrect Height Adjustment or Suction Settings
For upright vacuums or those with adjustable floorheads, an incorrect height setting can drastically affect performance. If the head is too high off the floor, it can’t create a proper seal, leading to poor pickup. Conversely, if it’s too low, it might be difficult to push and restrict airflow. Many vacuums also have suction control settings or vents; if these are accidentally left open or set too low, the vacuum’s power will be diminished.
Motor Issues or Electrical Problems
While less common and usually more serious, internal motor problems or electrical issues can also cause a loss of suction. A failing motor might not generate enough power, or a tripped circuit breaker or damaged power cord could prevent the vacuum from running at full capacity. For cordless models, a dying or faulty battery can lead to weakened suction.
Troubleshooting Steps for Different Vacuum Types
While many vacuum problems share common solutions, specific vacuum designs may require tailored troubleshooting.
Bagged Vacuums
Bagged vacuums rely on disposable bags to collect dirt. If your bagged vacuum isn’t picking up:
- Check the bag: Ensure it’s not full. Replace the bag when it’s two-thirds full or when the indicator signals it, even if it doesn’t look completely packed. Fine dust can clog the bag’s pores.
- Proper installation: Confirm the bag is correctly seated and sealed within its compartment. A misplaced bag can create air leaks.
Bagless Vacuums
Bagless models use a canister or dust cup. If your bagless vacuum is struggling:
- Empty the canister: Empty the dust cup after every use or when it reaches the “max fill” line. An overfilled canister severely restricts airflow.
- Clean internal components: Beyond the main filters, check any cyclone separators or internal screens within the dust cup assembly for fine dust buildup, which can also impede airflow.
Robot Vacuums
Robot vacuums have specific components to check for dirt pickup issues:
- Dustbin and filters: Regularly empty the small dustbin and clean the filters. Robot vacuums fill up quickly.
- Side brushes and main brush roll: Inspect the side brushes and main brush roll for tangled hair or debris. These are crucial for sweeping dirt into the suction path.
- Suction vents/ports: Ensure the suction port on the underside is clear of blockages.
- App settings: Check the companion app for any power settings that might be limiting suction.
Handheld Vacuums
These compact units can also lose suction:
- Small capacity: Handhelds have very small dustbins and filters that fill up quickly. Empty and clean them frequently.
- Nozzle blockages: Due to their smaller size, nozzles and internal air paths are more prone to blockages from larger debris. Use a thin tool to carefully clear any clogs.
- Battery life: For cordless handhelds, ensure the battery is fully charged, as low battery can directly impact suction power.
Maintaining Your Vacuum for Optimal Performance
Preventative maintenance is key to avoiding suction issues and extending the life of your vacuum cleaner.
Regular Filter Cleaning or Replacement
Make it a habit to clean or replace your vacuum’s filters according to the manufacturer’s recommendations.
- Washable filters: Rinse under cold water until clear, then allow to air-dry completely (usually 24 hours) before reinstalling.
- Non-washable filters: Tap out loose debris, and replace them periodically as advised by your vacuum’s manual.
Checking Hoses and Attachments
Periodically disconnect and inspect all hoses, wands, and attachments for blockages. A long, flexible brush or even a broom handle can help dislodge stubborn clogs. Also, check for any visible cracks or tears in the hose, which can cause air leaks.
Brush Roll Maintenance
Flip your vacuum over and routinely inspect the brush roll. Use scissors or a seam ripper to carefully cut away tangled hair, thread, or fibers. Ensure the brush roll spins freely and that its drive belt (if applicable) is intact and not stretched or broken. A clean brush roll effectively agitates carpets and helps pick up debris.
Proper Storage
Store your vacuum in a clean, dry place to prevent dust accumulation on external components and to protect electrical parts. If you have a cordless vacuum, ensure it’s charged according to manufacturer guidelines to maintain battery health.
When to Consider Professional Repair or Replacement
Sometimes, despite your best troubleshooting efforts, your vacuum might still not pick up dirt effectively. This is when you need to decide whether to seek professional repair or invest in a new unit.
If you’ve systematically gone through all the common fixes—cleaning filters, clearing blockages, inspecting brush rolls, and checking for leaks—and the suction remains weak or absent, the problem might be an internal mechanical failure. This could involve issues with the motor, the fan (impeller), or complex electrical components that are not easily accessible or repairable by a homeowner.
Consider professional repair if:
- Your vacuum is a high-end model that was a significant investment.
- It’s still under warranty (contact the manufacturer first).
- The repair cost is significantly less than buying a new, comparable model.
- You notice unusual sounds, burning smells, or the motor struggles to run.
Consider replacement if:
- The vacuum is an older, inexpensive model where repair costs would exceed its value.
- You’ve attempted all diagnostics, and the issue points to a major component failure like a motor, which is expensive to replace.
- The vacuum consistently overheats, indicating potential underlying issues.
- You’re looking for an upgrade with better features, energy efficiency, or different cleaning capabilities.
Consulting a reputable vacuum repair shop can provide a diagnosis and an estimate, helping you make an informed decision.
Conclusion
A vacuum cleaner that isn’t picking up dirt can be a genuine source of frustration, but in most cases, the solution is within reach. By systematically checking for common issues like clogged filters, blocked hoses, full dustbins, and tangled brush rolls, you can often restore your machine’s full suction power and extend its lifespan. Regular maintenance is your best defense against these problems, ensuring that your vacuum remains a reliable tool for keeping your home pristine. Don’t let a minor hiccup derail your cleaning routine; empower yourself with these troubleshooting tips.
What common Vacuum Cleaner problems have you successfully tackled in your home?
Frequently Asked Questions
Why is my vacuum suddenly not picking up anything?
If your vacuum suddenly stops picking up dirt, the most immediate causes are often a severe blockage in the hose or brush roll, or a completely full dust bag or canister. Start by checking these areas first for quick resolution.
How often should I clean my vacuum filters?
The frequency depends on usage and filter type, but a general rule is to clean washable filters monthly and replace non-washable ones every 6-12 months. Always consult your vacuum’s user manual for specific recommendations.
Can a broken belt cause my vacuum not to pick up dirt?
Yes, a broken or worn belt is a common cause of poor dirt pickup, especially on carpets. The belt drives the brush roll, and if it’s damaged, the brush won’t spin to agitate and lift dirt into the suction path.
How do I check for a blockage in my vacuum hose?
To check for a blockage, detach the hose from both ends of the vacuum. Look through it for any obstructions. You can also use a long, blunt object like a broom handle to gently push through the hose and clear any lodged debris.
Is it worth repairing an old vacuum cleaner with no suction?
It depends on the vacuum’s initial cost and the repair estimate. For high-end models, repair might be economical. For older, inexpensive units, the cost of parts and labor can quickly exceed the value of a new vacuum, making replacement a better option.