Has your once-powerful vacuum cleaner started losing its edge, leaving behind more dust than it picks up? Before you consider buying a new one, the culprit might be simpler and more affordable to fix than you think: a dirty vacuum filter. This small, often overlooked component is crucial for your vacuum’s suction power and the overall air quality in your home. Understanding how to properly clean and maintain your vacuum filter is key to restoring its peak performance, ensuring a cleaner living space, and extending the life of your appliance. Let’s delve into the world of vacuum filters and unlock the secrets to maximum suction.
Understanding Your Vacuum Filter: The Heart of Suction
A vacuum filter acts as your cleaning system’s lung, trapping dust, dirt, allergens, and other microscopic particles that are sucked in. Its primary function is twofold: to prevent these particles from being recirculated back into the air you breathe and to protect your vacuum’s motor from damage. Without an efficient filter, your vacuum would simply scatter dust, making your cleaning efforts futile and potentially exacerbating allergies or respiratory issues.
Over time, these filters become clogged with debris, forming a barrier that restricts airflow. This restriction forces the motor to work harder, leading to decreased suction, overheating, and ultimately, a shortened lifespan for your vacuum. Various types of filters exist, each with specific design and maintenance requirements. Common types include foam, pleated (cartridge), HEPA, and sometimes charcoal or cloth filters. Knowing your filter type is the first step toward effective maintenance.
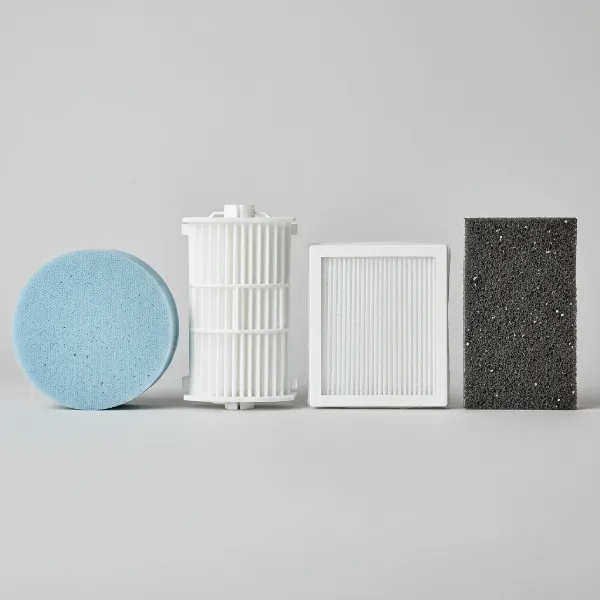 A collage showing various types of vacuum filters: foam, pleated, HEPA, and charcoal filters.
Recognizing the Need for Filter Cleaning
How do you know when your vacuum filter is crying out for attention? Your vacuum cleaner will often give you clear warning signs. One of the most immediate indicators is a noticeable reduction in suction power. If your vacuum isn’t picking up dirt as effectively as it used to, or if you find yourself going over the same spot multiple times, a clogged filter is a likely culprit.
Another critical sign is your vacuum’s motor overheating or the machine shutting off unexpectedly. A dirty filter restricts airflow, forcing the motor to overwork, which generates excessive heat. You might also notice unpleasant odors emanating from the vacuum during use, which can be caused by accumulated dirt, pet hair, and debris decaying within the filter. Visible dust escaping from the exhaust port of your vacuum is another red flag, indicating that the filter is no longer trapping particles effectively. In some cases, a clogged filter can even lead to strange whining or high-pitched noises from your vacuum. Paying attention to these signals will help you maintain your vacuum’s performance and ensure a healthier home environment.
Step-by-Step Guide to Cleaning Different Vacuum Filters
Cleaning your vacuum filter isn’t a one-size-fits-all process. The method largely depends on the type of filter your vacuum uses. Always consult your vacuum cleaner’s user manual for specific instructions, as manufacturer guidelines can vary significantly.
Cleaning Washable Foam Filters
|
Our Picks for the Best Vacuum cleaner in 2026
As an Amazon Associate I earn from qualifying purchases.
|
||
| Num | Product | Action |
|---|---|---|
| 1 | UNINELL HOME Cordless Vacuum Cleaner, 45,000Pa/450W Stick Vacuum Cleaners for Home, 60 Mins Runtime, Self-Standing, Detachable Battery, Anti-Tangle Brush, Lightweight Wireless Vacuum for Pet Hair |

|
| 2 | Eureka NEU10AE5 Powerful Bagless Upright Vacuum Cleaner Carpet and Floor, AirSpeed Ultra-Lightweight Vacuum Cleaner, w/ Replacement Filter, Blue |
|
| 3 | Bissell CleanView Compact Upright Vacuum, Fits in Dorm Rooms & Apartments, Lightweight with Powerful Suction and Removable Extension Wand, 3508 |
|
| 4 | Shark Upright Vacuum, Navigator Lift-Away Deluxe with Large Dust Cup Capacity, HEPA Filter, Swivel Steering, Upholstery Tool & Crevice Tool, Blue, NV360 |
|
| 5 | Cordless Vacuum Cleaner, 550W 45kPa 65Mins Vacuum Cleaners for Home with LED Display, Self-Standing Stick Vacuum with Anti-Tangle Brush, Rechargeable Vacuum Cordless for Pet Hair/Carpet/Floor |
|
| 6 | Eureka PowerSpeed NEU181A Upright Vacuum Cleaner For Daily Cleaning for Pet-Owning Households , 5-Height Adjustment-Powerful Suction-Large Dust Cup-Pet Turbo Brush,Suitabe For Carpets & Hard Floors |
|
| 7 | MONSGA Cordless Vacuum Cleaner, 45KPa 400W Stick Vacuum for Home, 50Mins Anti-Tangled Vacuum Cleaner with Charging Dock, Light-weighted Handheld Vacuum for Pet Hair/Carpet/Floor, LED Touch Display,MV3 |
|
| 8 | Eureka Lightweight Powerful Upright Vacuum Cleaner for Carpet and Hard Floor, PowerSpeed, New Model,Blue,black/New Model |
|
| 9 | Shark NV352 Navigator Lift Away Upright Vacuum, Hepa Filter, Anti-Allergen Technology, Swivel Steering, Ideal for Carpet, Stairs, & Bare Floors, with Wide Upholstery & Crevice Tools, Lavender |
|
| 10 | Bissell CleanView Compact Turbo Upright Vacuum with Quick Release Wand, Full Size Power, Compact Size for Apartments & Dorms, 3437F |
|
Foam filters are typically found in many bagless vacuums and are generally designed for easy cleaning and reuse.
- Remove the Filter: First, ensure your vacuum is turned off and unplugged. Carefully locate and remove the foam filter from its compartment.
- Shake Off Debris: Take the filter outside or over a trash can and gently tap it to dislodge loose dust, dirt, and pet hair.
- Wash with Water: Most foam filters can be washed with lukewarm water. Some manufacturers permit a few drops of mild dish soap or all-purpose cleaner. Submerge the filter and gently squeeze it repeatedly under running water until the water runs clear and all contaminants are released. Avoid harsh scrubbing or twisting, which can damage the foam.
- Dry Completely: This step is crucial. Squeeze out excess water and then allow the foam filter to air dry completely, ideally for at least 24 hours, before reinserting it into the vacuum. Placing it in a well-ventilated area away from direct heat is best. Reinstalling a damp filter can lead to mold growth and damage your vacuum.
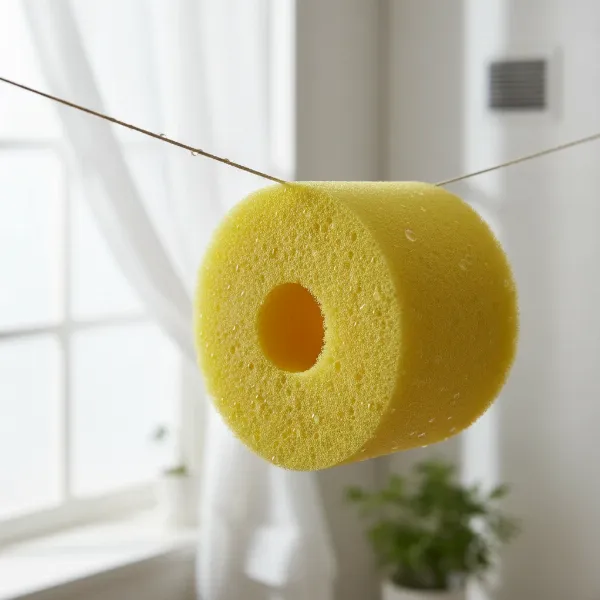 A freshly cleaned foam vacuum filter air drying completely in a well-ventilated area.
Cleaning Pleated or Cartridge Filters
Pleated or cartridge filters are commonly found in both bagged and bagless vacuums and often consist of paper or synthetic fibers folded into pleats. Many of these are not washable.
- Remove and Tap: After unplugging your vacuum, remove the filter. Take it outside and gently tap the filter against a hard surface or the inside of a trash bin to dislodge loose dust and debris from between the pleats.
- Brush Off Dirt: For more stubborn dirt lodged deep within the pleats, use a soft brush (like an old toothbrush or a paint brush comb) to gently remove particles. You can also use a brush attachment from another vacuum to lightly vacuum the filter surface.
- No Washing (Unless Specified): Most pleated paper or synthetic filters are not designed to be washed. Water can damage their delicate structure, compromise their filtration effectiveness, and even encourage mold growth. If your manual explicitly states it’s safe to wash, follow those instructions precisely; otherwise, stick to dry cleaning methods.
- Reinstall: Once you have removed as much debris as possible, reinstall the dry filter into your vacuum.
Maintaining HEPA Filters
HEPA (High-Efficiency Particulate Air) filters are highly effective at trapping tiny particles, including allergens, dust mites, and pet dander, making them popular for households with allergy sufferers.
- Check Washability: The critical point with HEPA filters is whether they are washable. While most HEPA filters are designed for replacement, some models are washable. Always check your vacuum’s manual.
- If Washable: If your HEPA filter is washable, carefully remove it and rinse it under lukewarm running water. Unlike foam filters, most washable HEPA filters should only be rinsed with clean water, without soap or detergents, as residues can impair their performance. Continue rinsing until the water runs clear.
- If Non-Washable: For non-washable HEPA filters, gentle tapping to remove loose dust is the only recommended cleaning method. Avoid using water, excessive force, or brushes, which can damage the fine fibers.
- Dry Completely: For washable HEPA filters, complete air drying is paramount. Allow at least 24 hours (or more, if necessary) in a well-ventilated area. Do not use heat to speed up the drying process.
- Replace Regularly: Even with proper cleaning, HEPA filters have a lifespan. Non-washable HEPA filters generally need replacement every 6-12 months, or up to two years with good maintenance, depending on usage and manufacturer recommendations.
Cleaning Bagless Canister Filters
Bagless vacuums often feature several filters, including a primary filter within the dust canister. These typically need more frequent attention.
- Empty Dustbin: After each use, or when full, empty the dustbin.
- Remove Filters: Locate and remove the filters associated with the canister, which may include foam or pleated types.
- Tap and Rinse: Tap out loose debris. If filters are washable, rinse them according to the specific instructions for foam or pleated filters.
- Dry Thoroughly: Ensure all components are completely dry before reassembling.
Essential Tips for Maximizing Vacuum Suction After Cleaning
Cleaning your vacuum filter is a significant step, but a few additional practices can ensure your vacuum operates at its absolute best, delivering maximum suction every time.
- Ensure Filters are Bone Dry: This cannot be overstressed. Reinstalling a damp filter not only risks mold and mildew growth but can also damage your vacuum’s motor and electronics. Always allow washable filters a full 24 hours or more to air dry completely.
- Check for Blockages: Even with a clean filter, blockages in the hose, attachments, or brush roll can severely impede suction. Regularly inspect these areas for lodged debris, pet hair, or larger items. Use a broom handle or a long tool to dislodge any obstructions.
- Empty the Dustbin Regularly: For bagless vacuums, emptying the dustbin after each use prevents excessive build-up that can quickly clog filters and reduce airflow. For bagged vacuums, change the bag before it becomes completely full.
- Replace Filters When Necessary: Filters, especially non-washable and HEPA types, have a finite lifespan. Over time, their ability to trap fine particles diminishes, even with cleaning. Pay attention to manufacturer recommendations for replacement frequency, typically every 3-6 months for standard filters and 6-12 months for HEPA filters, though some can last longer with good care.
- Clean Other Vacuum Components: The brush roll, hoses, and external surfaces also collect dirt and hair. Regularly cleaning these components contributes to overall efficiency and suction.
- Proper Storage: Store your vacuum in a clean, dry place to prevent dust accumulation and moisture exposure that could affect filters.
By combining thorough filter cleaning with these maintenance tips, you’ll ensure your vacuum cleaner consistently provides powerful suction, making your cleaning routine more effective and your home cleaner.
Common Mistakes to Avoid When Cleaning Filters
To ensure you get the most out of your vacuum filter and avoid costly damage, be aware of these common pitfalls:
- Not Drying Filters Completely: This is perhaps the most critical mistake. A filter that is even slightly damp when reinstalled can lead to foul odors, mold and mildew growth, and severe damage to your vacuum’s motor or electrical components. Always allow adequate air-drying time, usually 24 hours.
- Using Harsh Chemicals or Abrasive Brushes: Aggressive cleaning agents, strong soaps, or stiff brushes can degrade the filter material, especially in delicate pleated or HEPA filters. This compromises their filtration ability and can create holes or tears. Stick to mild detergents (if allowed) or plain water.
- Washing Non-Washable Filters: Attempting to wash paper or synthetic pleated filters that are not designed for water can permanently damage their structure, rendering them ineffective. Always refer to your vacuum’s manual to confirm if a filter is washable.
- Delaying Filter Cleaning or Replacement: Waiting too long to clean or replace a filter allows it to become excessively clogged, drastically reducing suction and putting a strain on the motor. This can lead to premature motor failure and diminished indoor air quality.
- Ignoring Manufacturer’s Instructions: Each vacuum model can have unique filter types and cleaning recommendations. Disregarding the user manual can lead to improper cleaning, damage, and voiding your warranty.
When to Replace Your Vacuum Filter
Even with diligent cleaning, vacuum filters don’t last forever. Knowing when to replace them is crucial for maintaining performance and air quality.
- Persistent Odors: If your vacuum continues to emit unpleasant or musty smells even after cleaning the filter, it’s a strong indicator that the filter material has absorbed odors that cannot be washed away, signaling it’s time for a replacement.
- Visible Damage or Wear: Inspect your filter for tears, holes, frayed edges, or excessive discoloration that won’t come clean. These indicate that the filter’s integrity is compromised and it can no longer effectively trap particles.
- Diminished Performance After Cleaning: If your vacuum’s suction power remains significantly reduced even after a thorough filter cleaning, the filter itself may be worn out and can no longer allow adequate airflow, necessitating replacement.
- Manufacturer Recommendations: Your vacuum’s user manual will provide specific guidelines for filter replacement frequency. For standard filters, this is often every 3-6 months, while HEPA filters might be recommended for replacement every 6-12 months or up to two years, depending on usage and model.
- Increased Allergy Symptoms: If you or family members experience an increase in allergy symptoms after vacuuming, it suggests that the filter is no longer effectively capturing allergens, allowing them to recirculate back into the air.
Replacing your filter proactively ensures your vacuum continues to provide the clean and healthy environment you expect.
Buying Guide: Choosing the Right Replacement Filter
When it’s time to replace your vacuum filter, choosing the correct one is just as important as knowing how to clean it. A mismatched filter won’t fit properly, can reduce efficiency, and may even damage your vacuum.
- Consult Your Manual: The most reliable source for finding the right replacement filter is your vacuum cleaner’s user manual. It will specify the exact filter model number or type required for your specific vacuum.
- Check Vacuum Model Number: If you don’t have the manual, the vacuum’s model number is usually found on a sticker on the bottom or back of the appliance. Use this number to search online for compatible filters.
- OEM vs. Aftermarket Filters: You generally have two options:
- OEM (Original Equipment Manufacturer) Filters: These are made by the original manufacturer of your vacuum and are guaranteed to fit and perform optimally. They often come with a higher price tag.
- Aftermarket Filters: Produced by third-party companies, these can be a more budget-friendly option. While many aftermarket filters perform well, it’s essential to choose reputable brands and check reviews to ensure quality and compatibility. Poorly made aftermarket filters may not fit correctly or offer the same level of filtration.
- Filter Type: Ensure the replacement filter matches the original type (e.g., HEPA for HEPA, foam for foam) to maintain your vacuum’s intended filtration capabilities.
- Where to Buy: Replacement filters can be purchased directly from the vacuum manufacturer’s website, major online retailers, appliance stores, or specialized vacuum repair shops.
Investing in the correct replacement filter is an investment in your vacuum’s longevity and your home’s cleanliness.
Conclusion
Maintaining your vacuum cleaner’s filter is a simple yet profoundly impactful task that directly affects both your home’s cleanliness and the lifespan of your appliance. A clean, well-maintained filter is the unsung hero behind every effective vacuuming session, ensuring maximum suction and trapping those microscopic irritants that can compromise indoor air quality. By understanding the different types of filters, recognizing the signs of a dirty one, and following proper cleaning and replacement guidelines, you empower yourself to keep your vacuum running efficiently for years to come. Remember, a vacuum is only as good as its filter. So, when did you last check yours?
Frequently Asked Questions
How often should I clean my vacuum filter?
The frequency depends on your vacuum type, usage, and environment. Washable filters often require cleaning every 1 to 3 months, while bagless vacuum canister filters may need attention after every few uses. Always refer to your specific model’s manual.
Can I put my vacuum filter in the washing machine?
No, vacuum filters should generally not be put in a washing machine. Most washable filters, like foam, should be hand-rinsed under lukewarm water. Washing machines can damage the filter material and compromise its effectiveness.
What happens if I don’t clean my vacuum filter?
Ignoring your vacuum filter leads to reduced suction power, forcing the motor to work harder and potentially causing it to overheat and fail prematurely. It also diminishes air quality by allowing dust and allergens to recirculate into your home.
How do I know if my HEPA filter is washable?
You must check your Vacuum Cleaner’s user manual to determine if your specific HEPA filter is washable. Most HEPA filters are designed for replacement, not washing, and attempting to wash a non-washable HEPA filter can destroy its filtration capabilities.
How long do vacuum filters last?
The lifespan of a vacuum filter varies by type and usage. Standard washable filters may last for several years with regular cleaning. Non-washable filters typically need replacement every 3-6 months, while non-washable HEPA filters can last from 6 months up to 2 years with good maintenance.