There’s little that sours the satisfaction of a freshly vacuumed floor more than a sudden, unpleasant odor wafting from your cleaning appliance. Instead of the fresh scent of cleanliness, you’re hit with a musty, burnt, or even rotten stench that permeates your home. This common household annoyance isn’t just an inconvenience; it often signals that your vacuum cleaner is in need of some attention. Understanding why your vacuum emits these foul odors is the first step toward reclaiming a truly fresh home environment. From accumulated pet dander to hidden moisture, various culprits can turn your powerful cleaning tool into a source of bad smells. Fortunately, most of these issues have straightforward and fast fixes.
Understanding the Unpleasant Odors from Your Vacuum Cleaner
Your vacuum cleaner works by drawing air and debris into a collection system, then filtering the air before expelling it back into the room. If there’s anything malodorous trapped within this system, that smell gets circulated throughout your home every time you vacuum. Different types of smells can even be clues, pointing you toward the specific problem area. A musty odor often suggests moisture or mold, while a burning smell indicates a more serious mechanical issue. Identifying the scent can significantly speed up your troubleshooting process.
Common Culprits: Why Your Vacuum Stinks
Discovering the root cause of your vacuum’s unpleasant smell is crucial for effective remediation. Many common household elements can contribute to the problem, transforming your cleaning device into an odor producer.
Full Dust Bag or Container
|
Our Picks for the Best Vacuum cleaner in 2026
As an Amazon Associate I earn from qualifying purchases.
|
||
| Num | Product | Action |
|---|---|---|
| 1 | Bissell CleanView Compact Upright Vacuum, Fits in Dorm Rooms & Apartments, Lightweight with Powerful Suction and Removable Extension Wand, 3508 |

|
| 2 | Eureka PowerSpeed NEU181A Upright Vacuum Cleaner For Daily Cleaning for Pet-Owning Households , 5-Height Adjustment-Powerful Suction-Large Dust Cup-Pet Turbo Brush,Suitabe For Carpets & Hard Floors |
|
| 3 | MONSGA Cordless Vacuum Cleaner, 45KPa 400W Stick Vacuum for Home, 50Mins Anti-Tangled Vacuum Cleaner with Charging Dock, Light-weighted Handheld Vacuum for Pet Hair/Carpet/Floor, LED Touch Display,MV3 |
|
| 4 | Eureka Lightweight Powerful Upright Vacuum Cleaner for Carpet and Hard Floor, PowerSpeed, New Model,Blue,black/New Model |
|
| 5 | Eureka NEU10AE5 Powerful Bagless Upright Vacuum Cleaner Carpet and Floor, AirSpeed Ultra-Lightweight Vacuum Cleaner, w/ Replacement Filter, Blue |
|
| 6 | Cordless Vacuum Cleaner, 550W 45kPa 65Mins Vacuum Cleaners for Home with LED Display, Self-Standing Stick Vacuum with Anti-Tangle Brush, Rechargeable Vacuum Cordless for Pet Hair/Carpet/Floor |
|
| 7 | Bissell CleanView Compact Turbo Upright Vacuum with Quick Release Wand, Full Size Power, Compact Size for Apartments & Dorms, 3437F |
|
| 8 | UNINELL HOME Cordless Vacuum Cleaner, 45,000Pa/450W Stick Vacuum Cleaners for Home, 60 Mins Runtime, Self-Standing, Detachable Battery, Anti-Tangle Brush, Lightweight Wireless Vacuum for Pet Hair |
|
| 9 | Shark NV352 Navigator Lift Away Upright Vacuum, Hepa Filter, Anti-Allergen Technology, Swivel Steering, Ideal for Carpet, Stairs, & Bare Floors, with Wide Upholstery & Crevice Tools, Lavender |
|
| 10 | Shark Upright Vacuum, Navigator Lift-Away Deluxe with Large Dust Cup Capacity, HEPA Filter, Swivel Steering, Upholstery Tool & Crevice Tool, Blue, NV360 |
|
One of the most frequent reasons for a stinky vacuum is simply a full or nearly full dust bag or canister. As dirt, dust, and debris accumulate, they can begin to decompose or emit odors, especially if they include organic matter like food crumbs or pet waste. These trapped particles become concentrated, and the stale air passing through them releases the unpleasant smell back into your home.
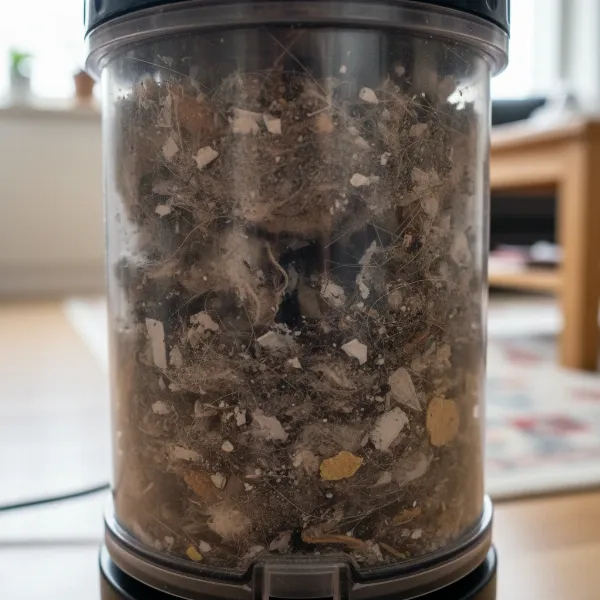 An overflowing vacuum dust bag filled with dirt, dust, and pet hair causing bad odor.
Clogged or Dirty Filters
Filters are your vacuum’s unsung heroes, trapping fine dust and allergens. However, over time, filters become saturated with dirt, dust, and microscopic particles. A clogged filter not only reduces your vacuum’s suction power but also becomes a breeding ground for bacteria and mold if any moisture is present. Whether your vacuum uses a disposable or reusable filter, a dirty one will inevitably lead to a foul odor as air is forced through the accumulated grime.
Pet Hair and Dander Accumulation
For homes with furry friends, pet hair and dander are significant contributors to vacuum odors. These materials can get deeply embedded in the brush roll, hoses, and even the dust bag/canister, trapping microscopic particles and oils that produce a distinctive “wet dog” or musty pet smell. The longer pet residue remains, the more intense the odor can become, making your vacuuming experience far from pleasant.
Moisture and Mold Growth
Accidentally vacuuming up wet spills or cleaning damp areas can introduce moisture into your vacuum cleaner. This damp environment, combined with collected dust and organic matter, creates ideal conditions for mold and mildew to thrive. The resulting musty, earthy smell of mold can be pervasive and unhealthy, indicating a deeper issue within the vacuum’s internal components. Always ensure surfaces are dry before vacuuming to prevent this.
Trapped Organic Debris
Sometimes, larger organic debris like food crumbs, bits of rotting leaves, or even small pest remnants can be inadvertently vacuumed up. These items, especially if perishable, will decompose inside the vacuum, releasing truly foul odors. This type of smell is often more pungent and specific, making it easier to identify the source once you inspect the internal components.
Blockages in Hoses and Brush Rolls
Beyond the dust bin and filters, the vacuum’s hoses and brush rolls are common areas for debris to get lodged. Hair, string, fabric scraps, and other larger items can form stubborn clogs, impeding airflow and trapping odor-causing particles. As the vacuum operates, the airflow pushes the trapped smells out, circulating them throughout your living space.
Motor Overheating or Worn Belt
If you detect a burning smell—like burnt plastic or rubber—this is a serious indicator of a mechanical problem. A burning smell often points to an overheating motor or a worn, slipping, or misaligned drive belt. When the motor strains due to blockages or age, or if the belt friction increases, it generates excessive heat, leading to that distinct burnt odor. This is not only unpleasant but can also pose a safety risk, potentially leading to more severe damage or even fire if not addressed promptly.
Step-by-Step Guide to Deodorize Your Vacuum Cleaner
Bringing your vacuum cleaner back to a state of freshness requires a systematic approach. By addressing each potential source of odor, you can effectively eliminate unpleasant smells and improve your vacuum’s performance.
1. Empty and Clean the Dust Bin or Bag
The simplest and often most effective first step is to empty your vacuum’s dust bag or canister immediately after it becomes full or even partially full. For bagless models, remove the canister, empty all debris into the trash, and then wash it with warm, soapy water. Ensure it is completely dry before reattaching it to prevent mold growth. If your vacuum uses bags, replace a full or smelly bag with a new one. This alone can resolve many odor issues.
2. Inspect and Clean/Replace Filters
Filters are a prime culprit for odors.
- Disposable Filters: If your vacuum has disposable filters, it’s best to replace them according to the manufacturer’s recommendations or when they appear visibly dirty and produce a smell.
- Reusable/Washable Filters: Carefully remove the reusable filter. Tap off any loose debris into a trash can. Rinse the filter thoroughly under cool running water until the water runs clear. For an extra clean, you can gently scrub it with a mixture of equal parts white vinegar and water to help break down odor-causing bacteria. The key is to allow the filter to air dry completely for at least 24 hours before putting it back in the vacuum. A damp filter will lead to mildew.
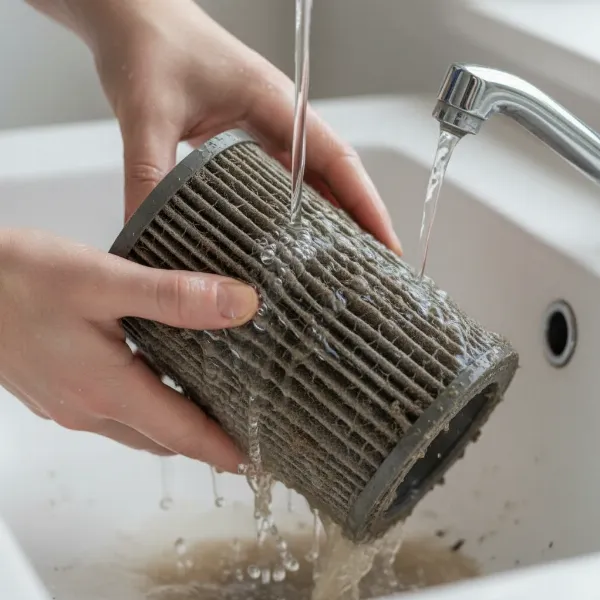 A hand rinsing a dirty reusable vacuum filter under running water to remove grime.
3. Clear Hoses and Brush Rolls
Disassemble your vacuum’s hose and brush roll (consult your manual for specific instructions). Look for any visible blockages, tangled hair, or accumulated debris. Use a broom handle or a long, thin object to push out clogs from the hose. For the brush roll, use scissors to cut away tangled hair and string. Ensure that the brush roll spins freely once cleared.
4. Clean the Brush Roll
After clearing major tangles, the brush roll itself might still retain odors. If removable, you can gently wash the brush roll with a mild soap and water solution, or a disinfectant wipe, paying attention to the bristles. Allow it to air dry thoroughly before reinstalling. This helps remove embedded grime and bacteria.
5. Clean the Exterior and Interior Components
Wipe down the entire exterior of your vacuum with a damp cloth and mild all-purpose cleaner. For the interior, especially around the motor housing and air vents, use a soft brush or a smaller handheld vacuum to remove any accumulated dust. Ensure all parts are completely dry before reassembling.
6. Address Persistent Odors with Deodorizers (Use with Caution)
For lingering smells, you can sparingly use deodorizing agents.
- Baking Soda: Sprinkle a small amount of baking soda on your carpet, let it sit for 15-20 minutes, then vacuum it up. Baking soda is excellent for absorbing odors.
- Carpet Powders: Some commercial carpet powders are designed to be vacuumed up and can leave a fresh scent.
It is important to note that some experts, like those at Dyson, advise against intentionally introducing large foreign objects or liquids like essential oils into the vacuum’s bin or onto filters, as this could reduce functionality, suction power, or even void your warranty. Always refer to your vacuum’s user manual for specific guidance on approved deodorizing methods.
Preventative Measures: Keeping Your Vacuum Smelling Fresh
A proactive approach to vacuum maintenance is the best way to prevent unpleasant odors from returning. Integrating a few simple habits into your cleaning routine can make a significant difference.
Establish a Regular Maintenance Schedule
Make it a habit to empty your vacuum’s dust bin or replace bags after every few uses, or when it reaches about two-thirds full. Regularly check and clean or replace filters as recommended by the manufacturer, typically every 3-6 months, or more frequently if you have pets or allergies. Inspect hoses and brush rolls for blockages once a month.
Avoid Vacuuming Certain Items
Be mindful of what you vacuum. Avoid picking up wet spills, large food scraps, excessive amounts of fine powders (like drywall dust, which can clog filters quickly), or anything that could melt or burn. For larger debris or liquid spills, use a dustpan and brush or appropriate cleaning methods first. This prevents moisture, mold, and decaying organic matter from entering your vacuum’s system.
Proper Storage
Store your vacuum cleaner in a cool, dry, and well-ventilated area. Storing it in a damp closet or basement can encourage mold and mildew growth inside the unit, leading to musty smells. Good airflow around the stored vacuum helps prevent moisture buildup.
Regular Pet Grooming
If you have pets, regular grooming can drastically reduce the amount of pet hair and dander that ends up in your vacuum. Brushing your pet frequently helps remove loose hair before it has a chance to settle into carpets and upholstery, thereby reducing the vacuum’s workload and the potential for pet-related odors.
When to Call a Professional or Consider a Replacement
While most vacuum odors can be resolved with thorough cleaning and maintenance, there are times when professional intervention or even a replacement is necessary. If you consistently encounter a burning smell despite clearing blockages and allowing the motor to cool, it could indicate a serious electrical or motor issue. In such cases, immediately unplug the vacuum and consult a qualified technician. Attempting to repair complex internal components yourself can be dangerous. If your vacuum is old, frequently breaks down, or deep cleaning fails to eliminate persistent, pervasive odors, it might be more cost-effective and hygienic to invest in a new, more efficient model.
Conclusion
A smelly vacuum cleaner is an annoyance no one wants, but it’s also a clear indicator that your machine needs attention. By understanding the common causes—from full dust bins and clogged filters to hidden moisture and mechanical issues—you can quickly diagnose and fix the problem. Regular cleaning, timely filter replacement, and careful vacuuming habits are your best defense against foul odors, ensuring your vacuum cleaner remains a powerful and pleasant tool in maintaining a clean home. Don’t let a stinky vacuum undermine your cleaning efforts; give it the care it needs for a truly fresh outcome. What’s your go-to trick for keeping your vacuum smelling fresh?
Frequently Asked Questions
Why does my vacuum cleaner smell like burning?
A burning smell typically indicates a mechanical issue, such as an overheating motor due to blockages, a worn-out drive belt slipping, or an electrical fault. Immediately unplug the vacuum, allow it to cool, check for any visible blockages or belt issues, and if the smell persists, seek professional repair to prevent further damage or potential fire hazards.
Can I put baking soda in my vacuum cleaner to make it smell better?
Yes, you can sparingly sprinkle baking soda on carpets before vacuuming to help absorb odors, which can indirectly improve the vacuum’s smell. However, avoid putting baking soda directly into the vacuum’s dust bin or onto filters, as excessive amounts or fine powders can clog filters and potentially damage the motor or void the warranty.
How often should I clean my vacuum’s filter?
The frequency of filter cleaning depends on your vacuum model, usage, and household environment (e.g., pets, allergies). Generally, reusable filters should be cleaned every 3-6 months, and disposable filters replaced at similar intervals or when visibly dirty. Always refer to your vacuum’s user manual for specific recommendations.
What should I do if my vacuum smells like mold?
If your vacuum smells like mold, it indicates moisture buildup. First, empty and thoroughly clean the dust bin/bag and filters, ensuring they are completely dry before reassembly (this can take 24 hours). Inspect the hose and other internal components for any damp areas or visible mold. If you find mold, clean the affected parts with a disinfectant solution, ensuring everything is bone dry. Avoid vacuuming wet surfaces in the future.