There’s nothing quite like the convenience of a robot vacuum, silently gliding across your floors, making your home spotless with minimal effort. Yet, this dream can quickly turn into a minor nightmare when your trusty robot vacuum decides to halt its mission, stuck beneath a couch, tangled in a charging cable, or simply confused in a corner. Why does this happen, and more importantly, how can you fix it? This comprehensive guide will walk you through the most common reasons your robot vacuum gets stuck and provide actionable solutions to get it back on track for uninterrupted cleaning.
Understanding Why Your Robot Vacuum Gets Stuck
Before diving into solutions, let’s explore the common culprits behind a robot vacuum’s navigation woes. From physical obstructions to sensor malfunctions, understanding the root cause is the first step toward a smoother cleaning experience. Many factors can contribute to a robot vacuum getting stuck, including floor clutter, uneven surfaces, and even issues with the robot’s internal components or software.
Robot vacuums are designed with various sensors and navigation systems, but even the most advanced models can encounter challenges in a dynamic home environment. Common reasons your robot vacuum might get stuck include:
- Physical Obstructions: Loose cables, small toys, clothing, or even pet waste are frequent offenders.
- Rugs and Carpets: High-pile carpets, shag rugs, or even the fringes of area rugs can tangle brushes or impede movement.
- Furniture and Tight Spaces: Low-clearance furniture, chair legs, or narrow gaps can trap robots that manage to squeeze in but can’t find their way out.
- Dirty or Malfunctioning Sensors: Dust, dirt, or debris on cliff, bumper, or navigation sensors can make your robot “blind” to its surroundings.
- Tangled Brushes and Wheels: Hair, string, and other debris wrapped around the main brush, side brushes, or wheels can seize the robot’s mobility.
- Battery Issues: A low battery might cause the robot to stop mid-cycle, or a faulty battery could prevent it from moving efficiently.
- Full Dustbin: An overflowing dustbin can sometimes hinder performance or trigger error alerts.
- Inadequate Lighting: For models relying on camera-based navigation, poor lighting can significantly hinder their ability to map and move.
- Software Glitches: Outdated firmware or incorrect app settings can lead to navigational errors.
Recognizing these issues is crucial for effective troubleshooting. Often, a simple adjustment to your home environment or a quick maintenance task can resolve the problem.
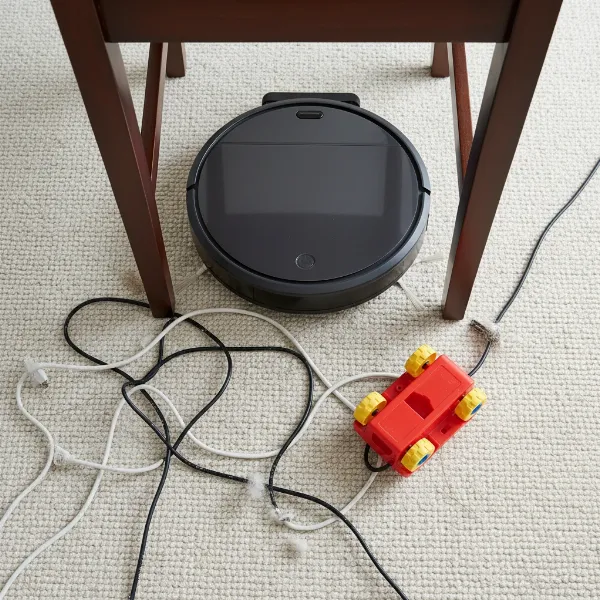 Robot vacuum stuck under a chair with cables and toys nearby, illustrating common obstructions
Environmental Solutions: Preparing Your Home for Seamless Cleaning
The easiest way to prevent your robot vacuum from getting stuck is to optimize its cleaning environment. A little preparation goes a long way in ensuring your robot can clean effectively and autonomously.
Taming Cables and Clutter
One of the most frequent reasons a robot vacuum halts its cleaning journey is due to loose items on the floor. Cords, socks, and small toys are particularly problematic, often getting tangled in brushes or blocking the robot’s path.
- Secure Loose Cords: Use cable ties, cord organizers, or adhesive clips to bundle and lift charging cables, extension cords, and appliance wires off the floor. Consider routing them behind furniture or along baseboards.
- Clear Small Objects: Before each cleaning cycle, do a quick “pre-clean” sweep of the floor. Pick up small items like pet toys, shoes, magazines, and children’s playthings. The fewer obstacles, the smoother your robot’s run.
- Be Mindful of Curtains and Drapes: Long curtains or drapes that pool on the floor can sometimes be mistaken for obstacles or get caught in brushes. Tuck them away if possible during cleaning sessions.
|
Our Picks for the Best Vacuum cleaner in 2026
As an Amazon Associate I earn from qualifying purchases.
|
||
| Num | Product | Action |
|---|---|---|
| 1 | Bissell CleanView Compact Turbo Upright Vacuum with Quick Release Wand, Full Size Power, Compact Size for Apartments & Dorms, 3437F |

|
| 2 | Cordless Vacuum Cleaner, 550W 45kPa 65Mins Vacuum Cleaners for Home with LED Display, Self-Standing Stick Vacuum with Anti-Tangle Brush, Rechargeable Vacuum Cordless for Pet Hair/Carpet/Floor |
|
| 3 | Eureka Lightweight Powerful Upright Vacuum Cleaner for Carpet and Hard Floor, PowerSpeed, New Model,Blue,black/New Model |
|
| 4 | Shark NV352 Navigator Lift Away Upright Vacuum, Hepa Filter, Anti-Allergen Technology, Swivel Steering, Ideal for Carpet, Stairs, & Bare Floors, with Wide Upholstery & Crevice Tools, Lavender |
|
| 5 | Eureka NEU10AE5 Powerful Bagless Upright Vacuum Cleaner Carpet and Floor, AirSpeed Ultra-Lightweight Vacuum Cleaner, w/ Replacement Filter, Blue |
|
| 6 | Shark Upright Vacuum, Navigator Lift-Away Deluxe with Large Dust Cup Capacity, HEPA Filter, Swivel Steering, Upholstery Tool & Crevice Tool, Blue, NV360 |
|
| 7 | UNINELL HOME Cordless Vacuum Cleaner, 45,000Pa/450W Stick Vacuum Cleaners for Home, 60 Mins Runtime, Self-Standing, Detachable Battery, Anti-Tangle Brush, Lightweight Wireless Vacuum for Pet Hair |
|
| 8 | Eureka PowerSpeed NEU181A Upright Vacuum Cleaner For Daily Cleaning for Pet-Owning Households , 5-Height Adjustment-Powerful Suction-Large Dust Cup-Pet Turbo Brush,Suitabe For Carpets & Hard Floors |
|
| 9 | Bissell CleanView Compact Upright Vacuum, Fits in Dorm Rooms & Apartments, Lightweight with Powerful Suction and Removable Extension Wand, 3508 |
|
| 10 | MONSGA Cordless Vacuum Cleaner, 45KPa 400W Stick Vacuum for Home, 50Mins Anti-Tangled Vacuum Cleaner with Charging Dock, Light-weighted Handheld Vacuum for Pet Hair/Carpet/Floor, LED Touch Display,MV3 |
|
Conquering Rugs, Carpets, and Thresholds
Rugs and carpets, especially those with high pile or tassels, are notorious for challenging robot vacuums. Different floor heights and textures can cause robots to get stuck or push rugs around.
- High-Pile and Shag Rugs: If your robot consistently struggles, consider blocking off these areas using virtual walls or no-go zones in your app. Alternatively, some modern robot vacuums are better equipped to handle varying carpet heights; check your model’s specifications.
- Area Rugs with Fringes: Tassels can easily get tangled in brushes. You can either tape them securely underneath the rug or use rug grippers/double-sided tape to keep the rug firmly in place and prevent edges from curling.
- Thresholds and Floor Transitions: For subtle height differences between rooms, you might consider installing low-profile transition strips or ramps specifically designed to help robot vacuums cross over smoothly. Ensure your robot vacuum has sufficient “climbing height” capabilities for your home’s transitions.
Navigating Furniture and Tight Spaces
Furniture can create tricky scenarios for robot vacuums, especially low-clearance pieces or tightly spaced legs. A robot might enter a narrow gap but then become trapped, unable to navigate back out.
- Assess Furniture Clearance: Measure the height of your robot vacuum and the clearance under your furniture. If there’s a tight fit, consider using furniture risers to increase the height.
- Adjust Dining Chairs and Bar Stools: Before a cleaning cycle, push dining chairs completely under the table or lift them onto the table to create an open cleaning area.
- Utilize Virtual Walls and No-Go Zones: For consistently problematic areas, such as complex chair arrangements or tight nooks, set up virtual boundaries in your robot’s app. This prevents the robot from entering areas where it’s likely to get stuck.
Optimizing Lighting for Navigation
Many advanced robot vacuums, particularly those with camera-based navigation systems (VSLAM), rely on adequate lighting to map your home and detect obstacles accurately.
- Provide Sufficient Light: If your robot vacuum operates in a room with poor natural light, ensure the lights are on during its cleaning cycle. This improves its ability to “see” and avoid obstacles, reducing the chances of it getting stuck.
- Dark Surfaces and Cliff Sensors: Some robot vacuums can confuse dark-colored carpets or floor tiles with cliffs, causing them to stop. While some apps offer a setting to disable cliff sensors (use with extreme caution, especially near stairs), a temporary fix can be to apply a small piece of reflective tape over the cliff sensors to trick them into sensing a solid surface.
Robot Vacuum Maintenance: Keeping Your Device in Top Shape
Just like any appliance, your robot vacuum requires regular maintenance to perform optimally and avoid getting stuck. Neglecting internal components can significantly impair its navigation and cleaning capabilities.
Cleaning Sensors for Enhanced Awareness
Dirty sensors are a leading cause of erratic behavior and getting stuck. Dust, pet hair, and grime can obscure the robot’s “eyes,” making it unable to detect obstacles or ledges accurately.
- Locate All Sensors: Consult your user manual to identify the location of all sensors, including cliff sensors (typically on the bottom), bumper sensors (on the front bumper), and optical/LiDAR sensors (on top or front).
- Gentle Cleaning: Power off your robot vacuum before cleaning. Use a soft, dry microfiber cloth to gently wipe each sensor window. For hard-to-reach areas or stubborn dust, a small brush (like a toothbrush) or a burst of compressed air can be effective.
- Avoid Harsh Chemicals: Never use abrasive cleaners or excessive moisture, as these can damage the delicate sensor components.
- Frequency: In homes with pets or high dust levels, clean sensors weekly. Otherwise, a monthly cleaning should suffice.
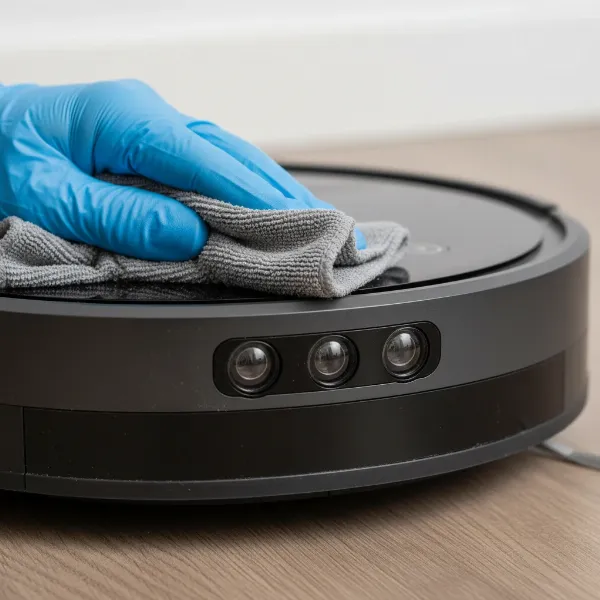 Hand cleaning optical sensors on a robot vacuum for better navigation and obstacle detection
Untangling Brushes and Wheels
Hair, string, and pet fur are common enemies of a robot vacuum’s mobility. These can wrap tightly around the main brush roll, side brushes, and wheels, causing them to jam and the robot to stop.
- Inspect and Remove Debris: Turn your robot vacuum over and carefully remove the main brush roll and side brushes according to your manual. Use scissors or the cleaning tool often provided with your vacuum to cut away any tangled hair or fibers.
- Clean Wheels and Axles: Ensure the wheels move freely. Pull them out gently (if your model allows) and clear any debris from around the axles. Hair and lint can accumulate here, restricting movement. This upkeep is critical for maintaining mobility.
- Regular Schedule: Check brushes and wheels after every few cleaning cycles, especially if you have shedding pets.
The Importance of an Empty Dustbin
A full dustbin might seem unrelated to getting stuck, but it can impact your robot’s performance. Some models may trigger an error or reduce suction power if the bin is completely full, which can indirectly affect its ability to clear minor obstacles or move efficiently.
- Empty After Each Use: Best practice is to empty the dustbin after every cleaning cycle. This not only prevents errors but also maintains optimal suction power.
- Consider Self-Emptying Models: If frequent emptying is a hassle, newer robot vacuums with self-emptying base stations can store dirt and debris for weeks, significantly reducing manual intervention.
Battery Health and Charging Contacts
A robot vacuum with a low or deteriorating battery might not have the power to navigate its environment effectively, leading it to get stuck or return to its dock prematurely.
- Ensure Proper Charging: Always ensure your robot vacuum is fully charged before starting a cleaning cycle. Keep the charging contacts on both the robot and its base station clean.
- Clean Charging Contacts: Use a dry cloth to wipe away any dirt or debris from the metal charging plates on both the robot and its dock at least once a month. This ensures a reliable connection and efficient charging.
- Monitor Battery Health: If your robot vacuum’s battery life significantly decreases, or it repeatedly fails to complete cleaning cycles despite regular charging, it might be time to consider a battery replacement.
Advanced Troubleshooting and Software Solutions
Sometimes, getting stuck isn’t just about physical obstacles or dirty parts; it can involve the robot’s internal intelligence or how it interacts with its environment via software.
Firmware Updates and App Settings
Modern robot vacuums are complex devices with sophisticated software. Keeping this software up-to-date is vital for optimal performance and bug fixes that can address navigation issues.
- Check for Updates: Regularly check your robot vacuum’s companion app for available firmware updates. Manufacturers often release updates to improve navigation algorithms, obstacle detection, and overall efficiency.
- Review App Settings: Explore your robot’s app for specific settings that might influence its behavior. This could include sensitivity settings for carpets, obstacle avoidance preferences, or cleaning modes that affect its movement patterns.
Utilizing Virtual Walls and No-Go Zones
Many smart robot vacuums allow you to digitally map your home and define specific areas they should avoid or stay within. These features are invaluable for preventing the robot from getting stuck.
- Define Restricted Areas: Use the app to draw “no-go zones” around problematic areas like pet food bowls, intricate furniture arrangements, or high-pile rugs.
- Set Virtual Walls: Create invisible barriers to block off entire rooms or sections where your robot vacuum frequently gets trapped. This can be more precise and effective than physical barriers.
- Charging Dock Placement: Ensure the charging dock is placed in an open area, free from obstacles, to allow the robot to return and dock easily without getting stuck nearby.
Addressing Dark Surfaces and Cliff Sensors
As mentioned earlier, some robot vacuums, particularly older models or those with less advanced cliff sensors, can misinterpret dark carpets or black floor patterns as a drop-off, causing them to stop or avoid the area.
- Temporary Reflective Solution: For persistent issues on dark surfaces where there are no actual cliffs, a common (though unofficial) fix involves taping a small piece of white paper or aluminum foil over the cliff sensors to reflect light and trick the sensor into perceiving a solid surface. Exercise extreme caution with this method, as it disables the safety feature that prevents falls down stairs.
- Consult Manufacturer: If this is a recurring problem, check with your robot vacuum’s manufacturer for model-specific advice or potential software adjustments.
When to Consider Professional Help or an Upgrade
You’ve tried all the troubleshooting steps, meticulously cleaned every sensor, untangled every brush, and optimized your home environment, yet your robot vacuum still gets stuck. At this point, it might be time to consider professional assistance or even a new device.
- Persistent Errors and Malfunctions: If your robot constantly displays error messages related to getting stuck, or if its movements remain erratic despite your best efforts, there might be an underlying hardware issue.
- Warranty Check: If your robot vacuum is still under warranty, contact the manufacturer’s customer support. They may offer repair services, replacement parts, or even a full replacement if a defect is found.
- Age and Technology: Robot vacuum technology has advanced significantly in recent years. Older models often lack the sophisticated obstacle avoidance (like AI-powered object recognition or LiDAR mapping) and advanced mapping capabilities found in newer devices. If your robot is several years old and struggles with a modern home environment, an upgrade could offer a far more seamless cleaning experience. New models like the Roborock Saros.