A damaged vacuum cleaner power cord can instantly turn a productive cleaning session into a frustrating halt. Beyond the inconvenience, a compromised power cord poses significant safety risks, including electric shock and fire hazards. Understanding how to address a broken cord safely, whether through a careful repair or a complete replacement, is crucial for maintaining both your appliance and your home’s safety. This guide will walk you through identifying cord damage, taking essential safety precautions, and performing the most common, safe solutions to get your vacuum back in action.
Understanding Vacuum Cleaner Power Cord Damage
Vacuum cleaner power cords endure considerable wear and tear, often getting bent, twisted, or even run over during routine cleaning. This constant stress can lead to various forms of damage that compromise the cord’s integrity. Common issues include frayed insulation, visible cuts or nicks in the outer jacket, exposed internal wires, and even complete breaks within the cord itself.
Such damage is not merely cosmetic; it creates serious electrical risks. Exposed wires can lead to electric shock if touched, and a short circuit caused by damaged insulation can quickly overheat, potentially igniting nearby materials and causing a fire. Therefore, identifying and addressing any cord damage promptly is paramount to preventing accidents and ensuring the safe operation of your vacuum cleaner. The decision to repair or replace often depends on the severity and location of the damage; minor damage near the plug might be suitable for a plug replacement, while more extensive issues warrant a full cord replacement.
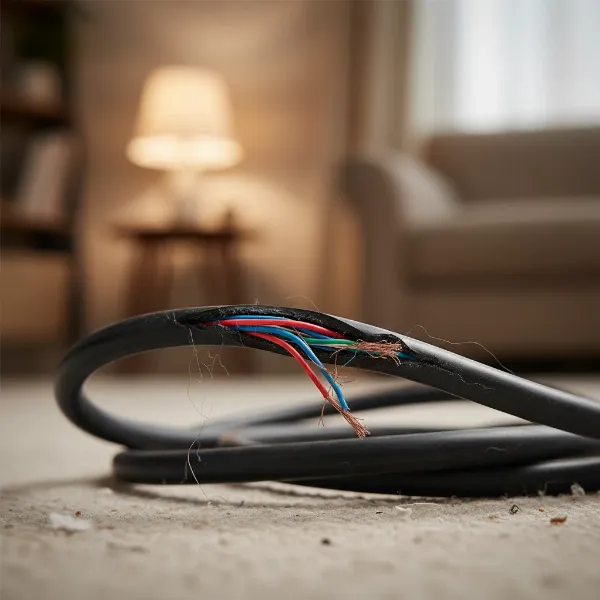 Close-up of a damaged vacuum cleaner power cord with frayed insulation and exposed copper wires.
Safety First: Essential Precautions for Electrical Repairs
Working with electrical appliances, even a vacuum cleaner, demands strict adherence to safety protocols. Before attempting any repair, always disconnect the vacuum cleaner from the power outlet. This is the single most critical step to prevent accidental electrocution. Next, gather the appropriate tools, such as insulated wire strippers, screwdrivers, a utility knife, and potentially a multimeter for testing, ensuring they are in good condition.
Familiarize yourself with basic electrical wiring colors: typically, black for hot, white for neutral, and green or bare copper for ground in a three-prong system. Never proceed if you are unsure about any step or if the damage seems too extensive or complex, especially involving the internal wiring or the vacuum’s motor. In such cases, consulting a qualified electrician or an appliance repair professional is the safest and most prudent course of action to avoid potential hazards and ensure the repair is done correctly.
Option 1: Replacing a Damaged Plug End
If the damage to your vacuum cleaner’s power cord is localized to the last few inches near the plug, replacing just the plug end is a viable and often straightforward solution. This approach saves you the hassle and cost of replacing the entire cord or buying a new vacuum. It’s ideal for situations where the prongs are bent or broken, or where the cord has frayed or been cut just before the plug.
When to Replace the Plug End
|
Our Picks for the Best Vacuum cleaner in 2026
As an Amazon Associate I earn from qualifying purchases.
|
||
| Num | Product | Action |
|---|---|---|
| 1 | Bissell CleanView Compact Turbo Upright Vacuum with Quick Release Wand, Full Size Power, Compact Size for Apartments & Dorms, 3437F |

|
| 2 | Eureka NEU10AE5 Powerful Bagless Upright Vacuum Cleaner Carpet and Floor, AirSpeed Ultra-Lightweight Vacuum Cleaner, w/ Replacement Filter, Blue |
|
| 3 | MONSGA Cordless Vacuum Cleaner, 45KPa 400W Stick Vacuum for Home, 50Mins Anti-Tangled Vacuum Cleaner with Charging Dock, Light-weighted Handheld Vacuum for Pet Hair/Carpet/Floor, LED Touch Display,MV3 |
|
| 4 | Eureka PowerSpeed NEU181A Upright Vacuum Cleaner For Daily Cleaning for Pet-Owning Households , 5-Height Adjustment-Powerful Suction-Large Dust Cup-Pet Turbo Brush,Suitabe For Carpets & Hard Floors |
|
| 5 | UNINELL HOME Cordless Vacuum Cleaner, 45,000Pa/450W Stick Vacuum Cleaners for Home, 60 Mins Runtime, Self-Standing, Detachable Battery, Anti-Tangle Brush, Lightweight Wireless Vacuum for Pet Hair |
|
| 6 | Bissell CleanView Compact Upright Vacuum, Fits in Dorm Rooms & Apartments, Lightweight with Powerful Suction and Removable Extension Wand, 3508 |
|
| 7 | Shark Upright Vacuum, Navigator Lift-Away Deluxe with Large Dust Cup Capacity, HEPA Filter, Swivel Steering, Upholstery Tool & Crevice Tool, Blue, NV360 |
|
| 8 | Shark NV352 Navigator Lift Away Upright Vacuum, Hepa Filter, Anti-Allergen Technology, Swivel Steering, Ideal for Carpet, Stairs, & Bare Floors, with Wide Upholstery & Crevice Tools, Lavender |
|
| 9 | Eureka Lightweight Powerful Upright Vacuum Cleaner for Carpet and Hard Floor, PowerSpeed, New Model,Blue,black/New Model |
|
| 10 | Cordless Vacuum Cleaner, 550W 45kPa 65Mins Vacuum Cleaners for Home with LED Display, Self-Standing Stick Vacuum with Anti-Tangle Brush, Rechargeable Vacuum Cordless for Pet Hair/Carpet/Floor |
|
You should consider replacing only the plug end when the visible damage is confined to the very end of the cord, typically within six to twelve inches of the plug itself. This includes issues like bent or broken prongs, cracked plug housing, or insulation that has been frayed or cut only at the very tip where it enters the plug. If the cord feels hot, sparks, or shows signs of burning further up, or if the vacuum frequently blows fuses, the problem might be more extensive, suggesting a full cord replacement is needed.
Tools and Materials Needed
To successfully replace a damaged plug end, you will need a few essential tools and materials. First, acquire a new replacement plug that matches the original in terms of prong configuration (two-prong or three-prong grounded) and amperage rating. You’ll also need a pair of insulated wire strippers to precisely remove insulation, a utility knife for carefully splitting the outer cord jacket, and a screwdriver set (flathead and Phillips, as needed) to work with the plug’s terminals. A voltage tester can be useful for post-repair verification.
Step-by-Step Guide
- Disconnect Power: Crucially, unplug the vacuum cleaner from the wall outlet before beginning any work to eliminate the risk of electric shock.
- Cut Off Damaged Section: Using strong wire cutters, make a clean cut across the power cord, ensuring you remove all damaged sections and leave a fresh, intact wire end.
- Prepare the Cord: Carefully use a utility knife to slit the outer jacket of the cord lengthwise about 1.5 to 2 inches, exposing the individual insulated wires inside. Be extremely cautious not to nick the insulation of the inner wires. Then, use wire strippers to remove about 1/2 to 3/4 inch of insulation from the end of each individual wire.
- Connect Wires to the New Plug: Open the new replacement plug according to its instructions. For a standard three-prong grounded plug, the green (ground) wire typically connects to the green screw, the white (neutral) wire to the silver screw, and the black (hot) wire to the brass or darker-colored screw. For a two-prong non-grounded plug, there will usually be a ribbed neutral wire connecting to the silver screw and a smooth hot wire connecting to the brass screw. Twist the exposed copper strands of each wire tightly before inserting them into the corresponding terminal and tightening the screws securely.
- Assemble the New Plug: Carefully route the wires within the plug housing to prevent pinching, ensuring the cord clamp firmly holds the outer jacket of the power cord, providing strain relief. Reassemble the plug halves, making sure all screws are tight and there are no exposed wire strands.
- Test Safely: Plug the vacuum cleaner into a ground fault circuit interrupter (GFCI) outlet if available. If a GFCI trips, there’s an issue with your wiring. Test the vacuum cleaner in a safe environment, watching for sparks, smoke, or unusual noises. If all seems normal, you have successfully replaced the plug.
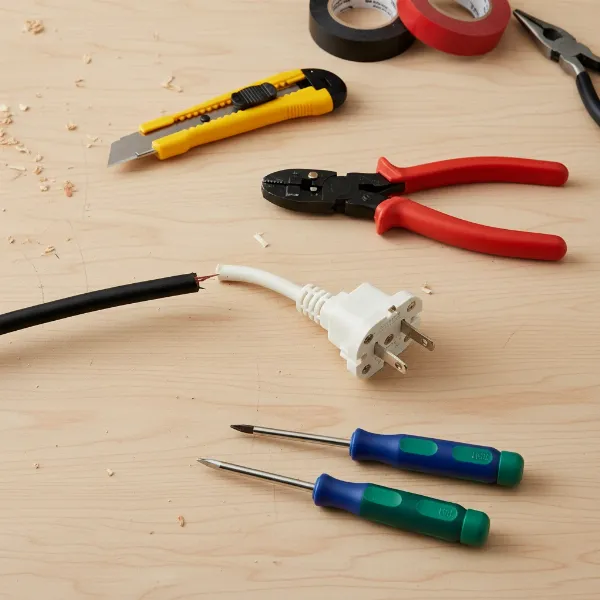 Image showing essential tools for replacing a vacuum cleaner plug and a new replacement plug.
Option 2: Replacing the Entire Vacuum Cleaner Power Cord
Sometimes, a simple plug replacement isn’t enough. If the damage extends further up the cord, involves internal wiring, or if the vacuum has a complex retracting cord mechanism that’s malfunctioning, replacing the entire power cord is the safest and most effective solution. This job is more involved, requiring you to access the vacuum cleaner’s internal components, but it’s often a necessary step to restore full functionality and safety.
When to Replace the Entire Cord
A complete cord replacement is necessary when the damage is not confined to the plug end but occurs further along the cord’s length, or when the cord exhibits internal issues such as intermittent power supply, excessive heat generation, or frequent fuse trips even without visible external damage. Furthermore, if your vacuum has a retractable cord system that is no longer functioning correctly—either failing to retract or causing kinks and damage during retraction—replacing the entire cord, including the retraction mechanism if it’s integrated, is often the recommended course of action. This ensures the entire electrical pathway is sound and prevents recurring problems.
Tools and Materials Needed
To embark on a full vacuum cleaner power cord replacement, you’ll need a suitable replacement cord that matches your vacuum’s specifications in terms of length, wire gauge, and plug type (two-prong or three-prong grounded). You will also require a variety of screwdrivers (Phillips, flathead, and possibly Torx depending on your vacuum’s fasteners) to disassemble the appliance. Insulated wire strippers and a utility knife will be essential for preparing the wire ends. A pair of needle-nose pliers can be helpful for manipulating small wires, and a multimeter is recommended for safely testing continuity and voltage after the repair.
Step-by-Step Guide
- Disconnect Power and Disassemble the Vacuum: Ensure the vacuum is unplugged. Carefully identify and remove screws, clips, or latches that hold the vacuum cleaner’s housing together to gain access to the internal wiring compartment where the power cord connects. This may involve removing the dust bin, filters, or specific covers.
- Note Existing Wire Connections: Before disconnecting anything, take clear photos or draw a diagram of how the old power cord’s wires are connected to the vacuum’s internal terminals or switch. Pay close attention to the color-coding (black, white, green/ground) and their corresponding connection points. This step is crucial for correct reassembly.
- Disconnect Old Cord: Once you understand the connections, carefully unscrew or unclip the old power cord’s wires from their terminals. If the cord runs through a strain relief mechanism, note how it is installed so you can replicate it with the new cord.
- Install New Cord: Route the new power cord through the vacuum’s casing, mimicking the path of the old cord. Secure the new cord’s wires to the appropriate internal terminals, following the diagram or photos you took in step 2. Ensure all connections are tight and secure, and that the strain relief mechanism is correctly reinstalled to prevent the cord from being pulled out accidentally.
- Reassemble Vacuum: Carefully reassemble the vacuum cleaner’s housing, ensuring all internal components are properly seated and all screws, clips, or latches are securely fastened. Check that there are no gaps or misalignments in the casing.
- Test Safely: Before using the vacuum, plug it into a GFCI outlet for the initial test. Observe for any unusual sounds, smells, or sparking. If the vacuum operates normally, it indicates a successful cord replacement. If issues persist, immediately unplug the vacuum and re-inspect your connections.
When to Seek Professional Help
While DIY power cord repairs can be empowering, there are situations where calling a professional is not just advisable, but essential for safety. If you feel uncertain at any point during the repair process, or if you lack experience with electrical wiring, it’s always best to err on the side of caution. Similarly, if your vacuum cleaner has a complex internal wiring system, or a particularly intricate cord retracting mechanism, tampering with it might cause more harm than good and could void your warranty.
Extensive damage that affects multiple parts of the vacuum or internal components, such as a burnt-out motor due to a severe short circuit, definitely warrants professional attention. Moreover, if after attempting a DIY repair, the vacuum still doesn’t work, sparks, smokes, or continues to trip circuit breakers, it’s a clear signal that a deeper electrical issue is at play. A professional technician possesses the expertise and specialized tools to diagnose and fix these problems safely and effectively, providing peace of mind and extending your appliance’s lifespan.
Maintaining Your Vacuum Cord for Longevity
Proper care and maintenance of your vacuum cleaner’s power cord can significantly extend its lifespan and prevent the need for frequent repairs. Simple habits can make a big difference in avoiding common types of cord damage. Always store the cord properly, whether by carefully coiling it by hand or allowing a retractable system to pull it in smoothly, without kinks or sharp bends.
Regularly inspect the entire length of the cord for any signs of wear, such as fraying, cuts, or discolored spots, paying close attention to the areas near the plug and where the cord enters the vacuum’s body. During operation, be mindful of the cord’s placement, actively avoiding running over it with the vacuum or trapping it under furniture, which can crush or sever the internal wires. By adopting these simple maintenance practices, you can minimize the risk of damage and ensure your vacuum cleaner remains a safe and reliable tool for years to come.
Conclusion
A damaged vacuum cleaner power cord doesn’t have to mean the end of your appliance. With a clear understanding of the risks, adherence to safety precautions, and the right approach, you can either safely replace a faulty plug end or undertake a full cord replacement. While DIY options can be cost-effective, recognizing when to call in a professional is equally important for both your safety and the longevity of your vacuum cleaner. By making informed decisions and practicing diligent cord maintenance, you empower yourself to keep your home clean and your appliances running safely.
Are you ready to tackle your vacuum’s cord issue, or will you seek expert assistance?
Frequently Asked Questions
Is it safe to repair a vacuum cord with electrical tape?
No, using electrical tape to repair a damaged vacuum cleaner cord is generally not safe. Tape offers only a temporary, unreliable fix for insulation and provides no structural integrity against pulling or bending. Given the high power draw of vacuums, a taped repair could lead to overheating, electric shock, or fire hazards. It’s always safer to replace the damaged plug or the entire cord.
Can I splice a vacuum cleaner power cord?
Splicing a vacuum cleaner power cord is strongly discouraged and unsafe. Spliced connections are often weaker, prone to overheating, and can lead to short circuits or electric shock due to inadequate insulation or poor connection quality. For safety and durability, it is recommended to replace the entire cord or at least the damaged plug end, rather than attempting a splice.
What causes vacuum cleaner cords to break?
Vacuum cleaner cords commonly break due to repeated stress from coiling, uncoiling, and being pulled. Running over the cord with the vacuum, trapping it under furniture, or improper storage can also cause cuts, fraying, or internal wire damage. Over time, the insulation can also degrade, leading to exposed wires and potential failure points.
How do I know if my vacuum cord needs to be replaced completely?
You should replace your entire vacuum cord if the damage extends beyond the plug end, if the cord frequently overheats, sparks, or trips circuit breakers, or if the vacuum has intermittent power issues. Damage to the internal wiring, or a malfunctioning retractable cord mechanism that cannot be easily repaired, also warrants a full cord replacement for safety.
What type of replacement cord should I buy for my vacuum?
When replacing a Vacuum Cleaner power cord, ensure the new cord matches the original’s specifications. This includes the wire gauge (thickness), length, and the type of plug (two-prong non-grounded or three-prong grounded). Refer to your vacuum’s manual or the existing cord’s markings for these details to ensure compatibility and safe operation.