Is your vacuum cleaner suddenly losing suction, emitting a strange smell, or shutting down unexpectedly mid-clean? Chances are, you’re experiencing an overheating issue, a common problem that can disrupt your cleaning routine and potentially damage your appliance. Many factors can lead to your vacuum’s motor working overtime, generating excessive heat, and triggering its protective thermal cutoff. Understanding these underlying causes and knowing the right steps to take can not only get your vacuum back in action but also extend its lifespan. This guide will walk you through why your vacuum overheats and provide practical, easy-to-follow solutions to cool it down and prevent it from happening again.
Understanding Vacuum Overheating: Why Your Cleaner Gets Too Hot
A vacuum cleaner is designed to pull air, dust, and debris through a system of hoses, filters, and collection bins. Its motor relies on this airflow to stay cool. When anything obstructs this crucial air circulation, the motor has to work harder to maintain suction, leading to increased friction and heat buildup. This is the primary reason vacuums overheat. Most modern vacuums are equipped with a thermal cutoff switch that automatically shuts down the motor when it reaches a critical temperature, preventing permanent damage. While this is a vital safety feature, frequent shutdowns indicate an underlying problem that needs addressing.
Common Culprits Behind an Overheating Vacuum
Several factors can contribute to your vacuum cleaner getting too hot. Identifying the specific cause is the first step toward a solution.
- Blocked Airflow Pathways: This is the most frequent cause. Obstructions in the hose, wand, or floor tool restrict the path for air, forcing the motor to strain.
- Full Dust Bag or Bin: When the dust bag or dirt cup is completely full, there’s little room for air to pass through, reducing airflow and putting stress on the motor.
- Clogged Filters: Filters are essential for trapping dust and allergens, but over time, they accumulate fine particles that block air passage. Dirty filters are a major contributor to overheating.
- Tangled Brush Roll: Hair, carpet fibers, and debris can wrap around the brush roll, preventing it from spinning freely. This creates resistance and heat, which can transfer to the motor.
- Worn Belt: In models with a drive belt for the brush roll, a worn or damaged belt can cause the motor to work harder without effectively turning the brush, leading to overheating.
- Motor Issues or Electrical Faults: Less commonly, the motor itself may be failing, or there could be an internal electrical issue. These problems typically require professional repair.
|
Our Picks for the Best Vacuum cleaner in 2026
As an Amazon Associate I earn from qualifying purchases.
|
||
| Num | Product | Action |
|---|---|---|
| 1 | Shark NV352 Navigator Lift Away Upright Vacuum, Hepa Filter, Anti-Allergen Technology, Swivel Steering, Ideal for Carpet, Stairs, & Bare Floors, with Wide Upholstery & Crevice Tools, Lavender |

|
| 2 | Eureka Lightweight Powerful Upright Vacuum Cleaner for Carpet and Hard Floor, PowerSpeed, New Model,Blue,black/New Model |
|
| 3 | Bissell CleanView Compact Upright Vacuum, Fits in Dorm Rooms & Apartments, Lightweight with Powerful Suction and Removable Extension Wand, 3508 |
|
| 4 | Cordless Vacuum Cleaner, 550W 45kPa 65Mins Vacuum Cleaners for Home with LED Display, Self-Standing Stick Vacuum with Anti-Tangle Brush, Rechargeable Vacuum Cordless for Pet Hair/Carpet/Floor |
|
| 5 | Eureka NEU10AE5 Powerful Bagless Upright Vacuum Cleaner Carpet and Floor, AirSpeed Ultra-Lightweight Vacuum Cleaner, w/ Replacement Filter, Blue |
|
| 6 | Eureka PowerSpeed NEU181A Upright Vacuum Cleaner For Daily Cleaning for Pet-Owning Households , 5-Height Adjustment-Powerful Suction-Large Dust Cup-Pet Turbo Brush,Suitabe For Carpets & Hard Floors |
|
| 7 | Shark Upright Vacuum, Navigator Lift-Away Deluxe with Large Dust Cup Capacity, HEPA Filter, Swivel Steering, Upholstery Tool & Crevice Tool, Blue, NV360 |
|
| 8 | UNINELL HOME Cordless Vacuum Cleaner, 45,000Pa/450W Stick Vacuum Cleaners for Home, 60 Mins Runtime, Self-Standing, Detachable Battery, Anti-Tangle Brush, Lightweight Wireless Vacuum for Pet Hair |
|
| 9 | MONSGA Cordless Vacuum Cleaner, 45KPa 400W Stick Vacuum for Home, 50Mins Anti-Tangled Vacuum Cleaner with Charging Dock, Light-weighted Handheld Vacuum for Pet Hair/Carpet/Floor, LED Touch Display,MV3 |
|
| 10 | Bissell CleanView Compact Turbo Upright Vacuum with Quick Release Wand, Full Size Power, Compact Size for Apartments & Dorms, 3437F |
|
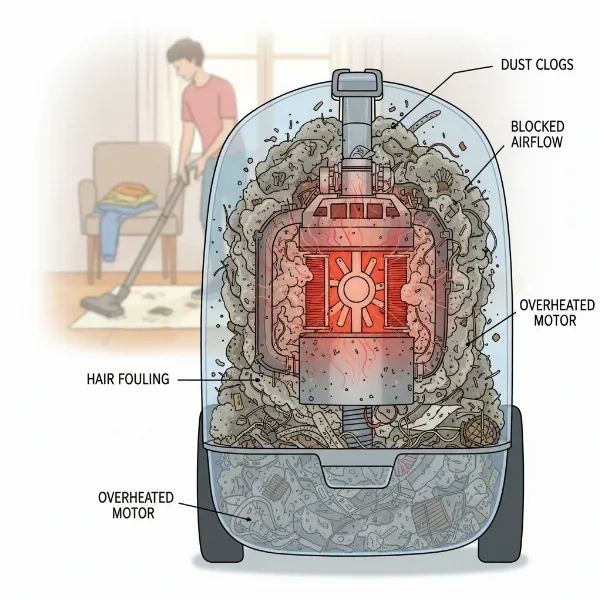 An illustration of a vacuum cleaner motor showing heat, surrounded by dust and debris.
Step-by-Step Guide: How to Cool Down and Fix Your Overheating Vacuum
When your vacuum overheats and shuts down, don’t panic. Follow these steps to safely address the issue and restore your cleaner’s performance.
Step 1: Unplug and Allow for Cooling
Safety first. Immediately turn off and unplug your vacuum cleaner from the power outlet. Place it in a well-ventilated area, away from direct sunlight, and allow it to cool down completely for at least 30 to 60 minutes. Attempting to troubleshoot a hot vacuum can lead to burns or further damage. The thermal cutoff needs time to reset.
Step 2: Empty the Dust Bin or Replace the Bag
A full dust container is a common and easy fix.
- For Bagless Vacuums: Remove the dust cup and empty all contents into a trash can. Clean the inside of the bin if there’s any caked-on dust or debris.
- For Bagged Vacuums: Remove the old, full bag and replace it with a new one. Even if the bag isn’t completely bursting, a partially full bag can still restrict airflow significantly.
Step 3: Inspect and Clean/Replace Filters
Filters are your vacuum’s lungs. Clogged filters are a prime culprit for reduced airflow and overheating.
- Locate your vacuum’s filters (pre-motor, post-motor, HEPA, etc.). Your user manual will show you where they are.
- Pre-Motor Filters: These often consist of foam or felt. Tap them gently to dislodge loose dirt. If they are washable, clean them according to the manufacturer’s instructions and ensure they are completely dry before reinserting.
- HEPA Filters: Many HEPA filters are not washable and need to be replaced periodically, typically every 6-12 months, depending on usage. Check your manual for specific guidance.
- Replace any filters that appear damaged, torn, or excessively dirty and cannot be cleaned.
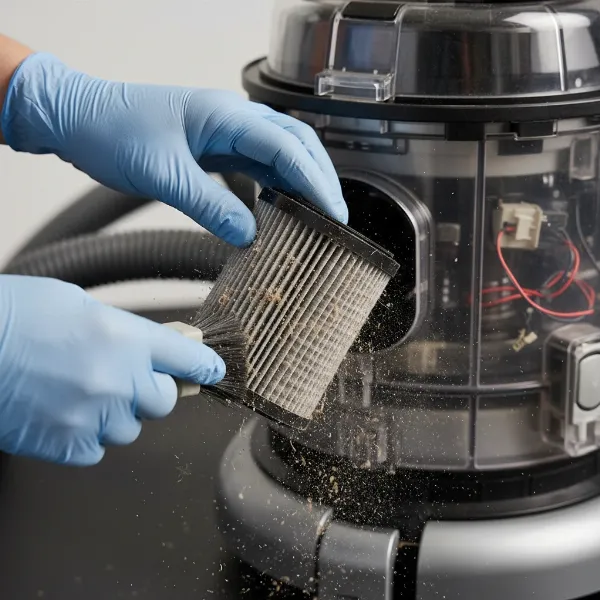 A person's hands cleaning a vacuum cleaner filter, emphasizing maintenance.
Step 4: Check for and Clear Blockages
Thoroughly inspect all airflow pathways for obstructions.
- Hose: Disconnect the hose from both the vacuum body and the attachment. Look through it for any visible blockages. You might use a broom handle or a long, blunt object (never anything sharp that could pierce the hose) to push out debris. For stubborn clogs, try passing a strong stream of water through washable hoses (ensure they are thoroughly dry before reattaching).
- Wand/Extension Tubes: Separate these components and check for anything lodged inside.
- Floor Tool/Brush Head: Turn the floor tool over. Remove any accumulated hair, strings, or debris wrapped around the brush roll. Many brush rolls can be easily removed for cleaning; consult your manual. Also, check the opening where dirt enters the floor tool.
- Air Intake/Exhaust Vents: Ensure these vents are clear of dust and not blocked by furniture or walls during operation.
Step 5: Test Your Vacuum
After performing these cleaning and maintenance steps, reassemble your vacuum cleaner. Plug it back in and run it for a short period on a low setting or on hard flooring. Listen for any unusual noises and feel for excessive heat. If it runs smoothly without overheating, you’ve likely resolved the problem.
Step 6: When to Seek Professional Help
If your vacuum continues to overheat rapidly, repeatedly shuts down despite thorough cleaning, or if you suspect a motor or electrical issue, it’s best to consult a qualified repair technician. Do not attempt complex internal repairs yourself, as this can void warranties or cause further damage.
Preventing Overheating: Best Practices for Vacuum Longevity
Proactive maintenance is key to preventing your vacuum from overheating and ensuring its reliable performance for years to come.
- Regularly Empty and Clean: Make it a habit to empty the dust bin or change the bag before it gets completely full, ideally after every few uses or when it’s about two-thirds full.
- Clean Filters Routinely: Follow your manufacturer’s recommendations for cleaning and replacing filters. This often means cleaning washable filters monthly and replacing non-washable ones every 6-12 months.
- Keep Pathways Clear: Periodically check the hose, brush roll, and other attachments for hair, strings, or debris that can cause blockages.
- Avoid Over-Straining: Don’t vacuum up large objects, excessive amounts of fine dust (like drywall dust), or liquids unless your vacuum is specifically designed for wet/dry use. These can quickly clog the system.
- Don’t Run Continuously for Too Long: For very large areas, consider breaking up the vacuuming into shorter sessions, allowing the motor to cool briefly between passes.
- Store Properly: Store your vacuum in a cool, dry place. Ensure exhaust vents are not covered when in storage or during use.
“Many vacuum owners overlook the importance of regular filter maintenance. A clean filter is just as crucial as an empty dustbin for maintaining optimal airflow and preventing motor strain, which is the root cause of most overheating issues.” – John Smith, Vacuum Repair Specialist
Conclusion
An overheating vacuum cleaner can be a frustrating experience, but by understanding its common causes—primarily restricted airflow due to full bags, clogged filters, or blockages—you’re well-equipped to tackle the problem. Simple maintenance steps like unplugging, cooling, emptying the bin, cleaning filters, and clearing obstructions can often resolve the issue and restore your vacuum’s full power. Regular preventative care is paramount to keep your vacuum running efficiently and to avoid unexpected shutdowns. By integrating these practices into your cleaning routine, you’ll not only prolong the life of your appliance but also ensure a cleaner, healthier home with minimal fuss. When was the last time you thoroughly checked your vacuum’s filters?
Frequently Asked Questions
Can running a vacuum for too long cause it to overheat?
Yes, prolonged continuous use, especially on high-power settings or heavily soiled areas, can cause the motor to heat up. While most vacuums have thermal protection, taking short breaks during extensive cleaning can help prevent overheating.
How often should I clean my vacuum filters to prevent overheating?
The frequency depends on your vacuum model and usage, but generally, washable filters should be cleaned every 1-3 months, and non-washable HEPA filters replaced every 6-12 months. Check your owner’s manual for specific recommendations.
Is it normal for my vacuum to get warm during use?
It’s normal for a Vacuum Cleaner to feel slightly warm during operation, as the motor generates some heat. However, if it becomes excessively hot to the touch, emits a burning smell, or shuts down, it’s an indication of overheating.
What should I do if my robot vacuum overheats?
For robot vacuums, the steps are similar: stop the cleaning cycle, let it cool down for 20-30 minutes, then empty its dustbin, clean its filters, and check for hair tangles in the brush or debris in the intake/exhaust ports.
Can a worn belt lead to vacuum overheating?
Yes, a worn or broken belt can cause the brush roll to stop spinning or spin inefficiently. This forces the motor to work harder without achieving proper cleaning, leading to increased heat and potential overheating.