Has your trusty vacuum cleaner lost its powerful pick-up, leaving behind dirt and debris? Or perhaps the brush roll has simply stopped spinning altogether? Often, the culprit is a worn or broken vacuum belt, a small but vital component that drives your machine’s cleaning action. Before you consider buying a new vacuum, know that replacing a vacuum belt is a straightforward DIY task that can restore your cleaner to its former glory. This comprehensive guide will walk you through the process, empowering you to fix your vacuum with confidence.
Diagnosing a Worn or Broken Vacuum Belt
Recognizing the signs of a failing vacuum belt is the first step towards a quick and effective repair. Your vacuum cleaner often gives clear indicators when its belt is nearing the end of its life or has already broken. Ignoring these symptoms can lead to reduced cleaning efficiency and potentially more significant damage to your machine.
- Loss of Suction Power: While multiple factors can reduce suction, a non-spinning or sluggish brush roll due to a stretched or broken belt significantly impairs a vacuum’s ability to lift dirt and debris.
- Unusual Noises: A slipping belt might create squealing or grinding sounds, indicating it’s struggling to maintain tension and drive the brush roll effectively.
- Brush Roll Stops Rotating: This is the most obvious sign. If your vacuum is on, but the brush roll isn’t spinning, the belt is almost certainly broken, severely stretched, or has slipped off.
- Burning Smell: A burning rubber odor is a strong indicator that the belt is slipping excessively on the motor shaft or brush roll, creating friction and heat. This can also occur if the brush roll is jammed.
- Visible Wear and Tear: If you inspect the belt directly, look for cracks, fraying, or significant stretching. A new belt should feel taut and firm; an old, stretched belt will feel loose.
- Leaving Debris Trails: After vacuuming, if you notice trails of dirt or pet hair remaining on your carpet, it suggests the brush roll isn’t agitating effectively, a common symptom of a failing belt.
Vacuum belts can fail for several reasons beyond normal wear. Over time, rubber belts naturally stretch and lose elasticity, leading to slippage. Accumulations of hair, string, or other debris around the brush roll can cause obstructions, placing immense strain on the belt until it breaks. Additionally, using an incorrect belt type or size, or improper installation, can significantly shorten a belt’s lifespan, causing it to break prematurely.
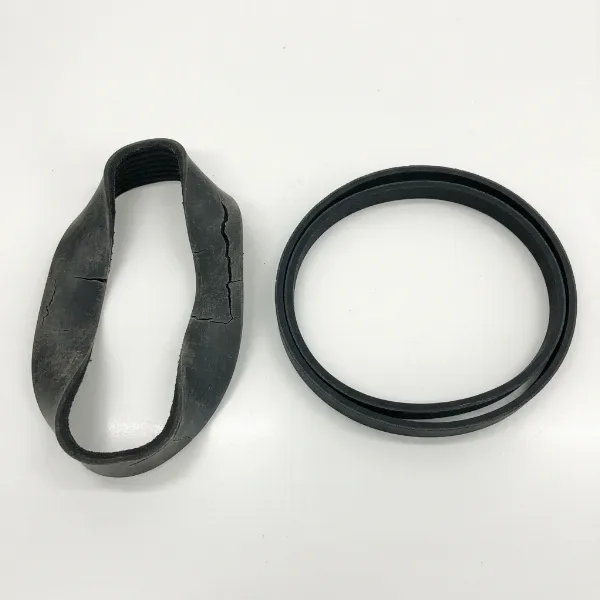 Close up of a broken vacuum belt next to a new one, showing visible wear and tear
Essential Tools and Safety First
Before you begin any DIY vacuum repair, gather the necessary tools and prioritize safety. Working with electrical appliances requires caution to prevent injuries.
Tools You’ll Likely Need:
- Screwdriver Set: You’ll typically need a Phillips-head or flat-head screwdriver, depending on your vacuum model, to remove the soleplate or brush roll cover.
- Replacement Vacuum Belt: Crucially, ensure you have the correct belt for your specific vacuum cleaner model. An ill-fitting belt can cause premature wear or damage.
- Flashlight: Vacuums often have tight, dark compartments, and a flashlight can illuminate hidden screws or clips.
- Soft Cloth or Gloves (Optional): These can help keep your hands clean and provide a better grip, especially if the old belt is greasy or covered in debris.
- Needle-Nose Pliers (Optional): Sometimes useful for removing stubborn or tightly wrapped debris, or for gently prying off a tricky belt.
- Clean Workspace: A clear, well-lit area ensures you don’t lose small screws or parts and allows you to work comfortably.
Safety Precautions:
- ALWAYS UNPLUG YOUR VACUUM: Before attempting any inspection or repair, disconnect your vacuum cleaner from the power outlet. This is the most critical safety step to prevent electric shock or accidental activation.
- Avoid Forcing Parts: Vacuum components are often made of plastic. Use gentle but firm pressure when disassembling and reassembling to avoid breaking clips or snapping plastic tabs.
Step-by-Step: Replacing Your Vacuum Belt
Replacing your vacuum belt is a straightforward process that typically involves five key steps. Follow these instructions carefully to ensure a successful repair.
Step 1: Access the Brush Roll Compartment
|
Our Picks for the Best Vacuum cleaner in 2026
As an Amazon Associate I earn from qualifying purchases.
|
||
| Num | Product | Action |
|---|---|---|
| 1 | Shark Upright Vacuum, Navigator Lift-Away Deluxe with Large Dust Cup Capacity, HEPA Filter, Swivel Steering, Upholstery Tool & Crevice Tool, Blue, NV360 |

|
| 2 | Eureka Lightweight Powerful Upright Vacuum Cleaner for Carpet and Hard Floor, PowerSpeed, New Model,Blue,black/New Model |
|
| 3 | Eureka NEU10AE5 Powerful Bagless Upright Vacuum Cleaner Carpet and Floor, AirSpeed Ultra-Lightweight Vacuum Cleaner, w/ Replacement Filter, Blue |
|
| 4 | Shark NV352 Navigator Lift Away Upright Vacuum, Hepa Filter, Anti-Allergen Technology, Swivel Steering, Ideal for Carpet, Stairs, & Bare Floors, with Wide Upholstery & Crevice Tools, Lavender |
|
| 5 | Eureka PowerSpeed NEU181A Upright Vacuum Cleaner For Daily Cleaning for Pet-Owning Households , 5-Height Adjustment-Powerful Suction-Large Dust Cup-Pet Turbo Brush,Suitabe For Carpets & Hard Floors |
|
| 6 | MONSGA Cordless Vacuum Cleaner, 45KPa 400W Stick Vacuum for Home, 50Mins Anti-Tangled Vacuum Cleaner with Charging Dock, Light-weighted Handheld Vacuum for Pet Hair/Carpet/Floor, LED Touch Display,MV3 |
|
| 7 | Cordless Vacuum Cleaner, 550W 45kPa 65Mins Vacuum Cleaners for Home with LED Display, Self-Standing Stick Vacuum with Anti-Tangle Brush, Rechargeable Vacuum Cordless for Pet Hair/Carpet/Floor |
|
| 8 | Bissell CleanView Compact Turbo Upright Vacuum with Quick Release Wand, Full Size Power, Compact Size for Apartments & Dorms, 3437F |
|
| 9 | Bissell CleanView Compact Upright Vacuum, Fits in Dorm Rooms & Apartments, Lightweight with Powerful Suction and Removable Extension Wand, 3508 |
|
| 10 | UNINELL HOME Cordless Vacuum Cleaner, 45,000Pa/450W Stick Vacuum Cleaners for Home, 60 Mins Runtime, Self-Standing, Detachable Battery, Anti-Tangle Brush, Lightweight Wireless Vacuum for Pet Hair |
|
To begin, you need to expose the area where the belt and brush roll are located. Lay your vacuum cleaner gently on its front, allowing easy access to the underside. Locate the soleplate or brush roll cover, which is usually secured by screws or snap clips. Use your screwdriver to remove any screws, placing them in a safe spot so they don’t get lost. If your model uses clips, gently pry them open.
Step 2: Remove the Old Belt and Clean
Once the cover is off, you’ll see the brush roll and, likely, the old belt. If the belt is broken, pieces might be scattered, or it may have simply come off the brush roll or motor shaft. If it’s still intact, carefully slide the brush roll out of its housing. Then, remove the old belt, noting how it was positioned around the brush roll and the motor shaft. This is an excellent opportunity to clean any accumulated hair, string, or debris from the brush roll itself and its housing. A clean brush roll spins more freely, reducing strain on the new belt.
Step 3: Install the New Belt
This step requires a little finesse. First, loop the new belt around the motor shaft. The motor shaft is typically a small metal spindle located near where the brush roll sits. Once the belt is securely on the motor shaft, stretch the belt around the brush roll, ensuring it sits properly in the designated groove. The new belt should feel snug and taut. Avoid overstretching it excessively during installation, as this can weaken the belt or cause it to snap prematurely.
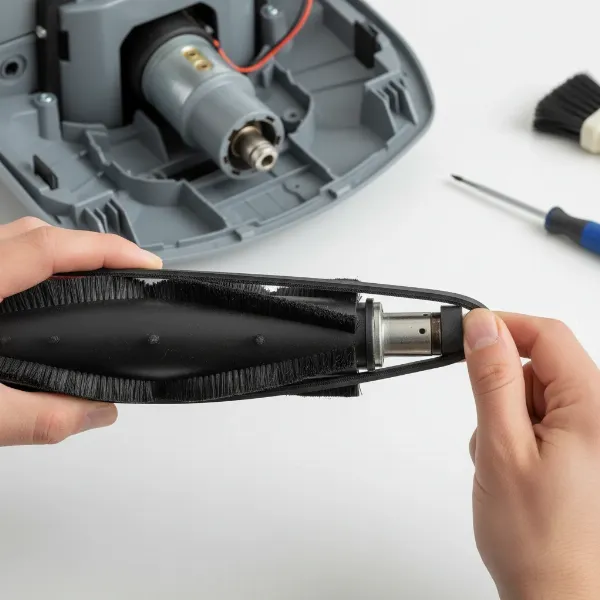 Hands carefully installing a new vacuum belt onto the brush roll and motor shaft of a vacuum cleaner
Step 4: Reassemble Your Vacuum
With the new belt in place, carefully return the brush roll to its position in the vacuum’s base. Ensure the ends of the brush roll snap correctly into their bearings. Double-check that the belt remains properly seated on both the motor shaft and the brush roll. Then, reattach the brush roll cover or soleplate, securing it with the screws or clips you removed earlier. Make sure all parts are firmly in place before proceeding.
Step 5: Test for Optimal Performance
The moment of truth! Plug your vacuum cleaner back into an electrical outlet. Turn it on and listen carefully. You should hear a smooth motor sound, and the brush roll should spin freely and consistently. Carefully observe the brush roll’s rotation to confirm it’s working as expected. Finally, test the vacuum on a small section of carpet or hard floor to confirm that it’s picking up dirt and debris with renewed power. If everything seems to be in order, congratulations—you’ve successfully replaced your vacuum belt!
Choosing the Right Replacement Belt
Selecting the correct replacement belt is crucial for your vacuum’s performance and the longevity of the new belt. Vacuum cleaner belts are not universal; each vacuum model typically requires a specific size and type.
There are primarily three types of vacuum belts:
- Flat Belts: These are the most common type and are smooth on both sides. They stretch over time and generally require replacement every 6-12 months.
- Round Belts: Less common than flat belts, these are also smooth and stretch over time.
- Geared (or Cogged) Belts: These belts have “teeth” on the inside that fit into corresponding gears on the brush roll and motor shaft. They are designed for greater efficiency and typically last much longer, often for several years, as they don’t rely on tension as much as smooth belts.
To find the right belt, consult your vacuum cleaner’s owner’s manual. Often, the belt information (part number or style) is printed directly on the vacuum’s model label or near the brush roll compartment. If your old belt is still intact, you might find a number stamped on it. “Double-check belt size: If the belt is too tight, it’ll snap quickly; too loose and it will slip off. Measure your old belt or check your vacuum’s manual for the exact type.”
Expert Tips for Longevity and Avoiding Mistakes
Beyond the basic steps, a few expert insights can help you avoid common pitfalls and extend the life of your vacuum belt.
- Organize Your Parts: Keep all screws and removed components in a single, visible spot (like a small bowl) to prevent them from getting lost during the repair.
- Utilize Good Lighting: Adequate lighting is your best friend when working with small components and dark spaces within your vacuum.
- Don’t Force the Belt: While a new belt needs to be snug, never try to forcibly stretch or pull it too hard during installation. This can cause immediate damage or significantly shorten its lifespan.
- Regular Brush Roll Cleaning: Preventative maintenance is key. Regularly inspect and clean your brush roll of tangled hair, string, and debris to reduce strain on the belt and prevent premature breakage.
- Avoid Vacuuming Large Objects: Running over large debris like socks, coins, or heavy paper clips can jam the brush roll, causing the belt to snap under sudden stress.
- Consider Genuine Parts: While generic belts are available, investing in an original equipment manufacturer (OEM) belt or a high-quality equivalent can offer better durability and performance tailored to your specific vacuum.
Conclusion
Replacing a vacuum belt is a straightforward and rewarding DIY task that can save you money and revive your vacuum’s cleaning prowess. By following these five easy steps—accessing the compartment, removing the old belt and cleaning, installing the new one, reassembling, and testing—you can confidently tackle this common household repair. Remember the importance of choosing the correct belt and adhering to safety precautions for a seamless experience. Don’t let a simple broken belt stop you from enjoying clean floors; empower yourself with this simple fix. How often do you check your vacuum belt for wear and tear?
Frequently Asked Questions
How often should I replace my vacuum belt?
For most common flat or round vacuum belts, manufacturers generally recommend replacement every 6 to 12 months, or sooner if you notice symptoms like reduced performance or unusual noises. Geared belts, however, are designed to last longer and may only need checking annually or when signs of wear appear.
What causes a vacuum belt to break frequently?
Frequent belt breakage can be caused by several factors, including an obstructed brush roll (due to tangled hair or debris), a worn-out or damaged brush roll itself, using the wrong type or size of replacement belt, improper installation, or regularly vacuuming very thick carpets or large objects that jam the brush.
Can I use any belt for my vacuum?
No, it is crucial to use a replacement belt specifically designed for your vacuum cleaner’s make and model. Belts vary in size, thickness, and type (flat, round, or geared), and using an incorrect belt can lead to poor performance, premature breakage, or even damage to your vacuum’s motor or brush roll. Always consult your vacuum’s manual or the vacuum’s product label for the correct belt specifications.